Skip to content

Yellow Chicken Curry (Low Carb)

Yellow chicken curry is a simple but authentic Indian curry that is easy to make!

Low in net carbs and high in flavour, this curry recipe makes an excellent keto meal when paired with cauliflower rice or a low carb bhaji.

Low carb yellow chicken curry in a white bowl from above

Just 5.3g net carbs per serving!

Pair this curry with oven roasted cauliflower rice or celeriac bhaji

SHARE THIS NOW.

Yum

SERIOUSLY, DO IT.

Disclosure: Some of the links below are affiliate links, meaning, at no additional cost or effort to you, I will earn a small commission if you click through the link and make a purchase.

This easy curry has been a staple in our family for decades.

It’s so simple yet so unbelievably delicious. 

Yellow chicken is a mild Indian curry that uses common easy to find ingredients, and its a great introduction to making and eating curry!

It’s always the first curry I make for people who have never tried curry before and it never fails to impress.

This is an ad.

About This Recipe

  • A simple Indian curry that uses common available spices and ingredients
  • A straightforward cooking method that is a great introduction to making Indian curry
  • Low in net carbs with only 5.3g per serving!
  • Tastes even better as meal prep or leftover since the flavours improve with time
  • Better and cheaper than takeout curry.
Yellow chicken curry on a spoon

What You Need To Know

Below are key details that will help you make this curry perfect every time. 

For a full set of ingredients and directions, or to make this curry now jump to the recipe card

Starting the curry

Every good curry will start with building a good gravy, and every good curry gravy starts with a strong base. 

The base of this curry is onions, garlic, and ginger, fried in oil. If done properly the onions will almost melt into the gravy packing it full of flavour. 

To start the curry gravy:

  • fry the thinly sliced onion, garlic, and ginger, in a pot with hot oil over medium heat for 8-10 minutes to add some colour to the onions, which will enhance the flavours.
  • You know you are done with this step when the center of the onions is starting to turn translucent and the edges are just browning. 


Tips: The oil/butter or ghee used for frying can disappear quickly during this step so make sure you add more as necessary. 

Three things not to skimp on in a good curry are fat, salt, and time.

Onions, garlic, and ginger frying in oil for chicken curry
The onions are just starting to brown and are ready for the spices
This is an ad.

Tempering the Spices is a Must

I try to hammer this home in all my recipes, but its soo important. 

The amount of people that don’t toast, temper, or cook spices properly is too damn high!

You know what doesn’t taste good? Raw spices. 

You know what doesn’t distribute its flavour evenly throughout a dish? Raw spices. 

You know what can drastically affect the flavour, and even texture of a dish? Raw spices. 

COOK. YOUR. SPICES. ALWAYS.

How and When to Temper Spices

When: Once the onions are done browning and you are ready to add the spices to the dish, any whole spices first, then ground spices next. 

How: 

  • Make a well in the onions to expose the hot pan, add oil if the pan is dry. 
  • Add the spices to the well and cook them in the oil for 10-15 seconds, and then mix everything around with the onions.


Tips: This will dry the pan out quickly so add oil as needed to prevent burning.

Spices can burn in seconds so keep an eye on them!

Make a well in the onions and add the spices to cook

Adjusting the Spice Level

The spice in this curry will be controlled mostly by the hot chili powder used and how much of it. 

If you don’t have access to Kashmiri chili powder, use cayenne powder, but use it sparingly. 

For a mild to medium curry, ¼ teaspoon at most. 

Increase as you feel fit. 

The whole chilies added don’t really affect the heat all that much unless you chop them up. They are more for flavour and I like to eat them with my curry to increase the heat of my bowl.

Note: In Indian recipes when it says chili powder, it means powder made from ground hot chilies like Kashmiri or cayenne powder. NOT the chili powder spice blend commonly used in chili, taco seasoning, Mexican food, and Southwestern cooking. 

This is an ad.

Water-Frying the Spices and Onions

Water frying is a technique where water is added in small amounts, then simmered off to help break down the spices and onions into the gravy. 

I don’t see this process explained well in many Indian recipes and even my own family recipes but it is a gam changer. This was observed by peeking over my Grandma’s shoulder as she cooked. 

How To Water-Fry

  • After tempering the spices, start adding small amounts of water to the pot 2-3 tablespoons at a time. 
  • Use the water to “fry” the onions and spices until the water completely simmers off. 
  • Once the water has cooked off, add another 2-3 tablespoons and repeat the process. 
  • Only add the water 2-3 tablespoons at a time to avoid drowning the pan and cooling it too much. 
  • Continue repeating this process until the onions and spices have formed a smooth paste. 
  • It can take repeating this 4-5 times (or about a cup of water total) to get the desired consistency. 
Onions and curry spices before water frying
This is what the onions and spices look like before water frying
Onions spice paste after water frying for making Indian curry
This is what the onions and spices look like after repeated water frying

This technique is the best way to start a curry gravy. 

It’s common to use a blender or food processor when starting a curry to break down the onions ahead of time which is like a quickie version of this.

You can do that, but not only is it more dishes to clean, you miss out on many layers of flavour that are achieved by frying the onions until they break down.

Water Frying Basics

  • Make sure the pot is hot and the onions and spices are already fried and tempered appropriately. 
  • Add small splashes of water to the pot, it should immediately simmer and sizzle. 
  • Stir everything around until the water is cooked off. The onions will already be noticeably softer.
  • Keep adding water in small amounts and repeating the water frying process until the onions and spices have formed a thick paste.
Other Recipes That Use This Technique
This is an ad.
Boneless chicken in low carb yellow chicken curry

Frying The Chicken Adds More Flavour

There are actually two methods for frying the chicken in a curry. 

Method 1: Right at the beginning before you start, fry the chicken, with salt and pepper right in the pot until it is just browned and cooked through, then remove it and set it aside while you start the gravy.  

Use the same pot you fried the chicken in to start the gravy for extra flavour and re-add the chicken after the water frying is done. 

Method 2: Add the raw chicken right after water frying, and cook over medium heat until it’s cooked through and starting to brown.

Don’t let the spices and onion paste burn at this point, add oil as necessary and stir occasionally, scraping the bottom of the pot to prevent burning. 

Once the chicken is fully cooked, I recommend tasting a piece to test the seasoning. It’s important to season each step.

What chicken is used for curry?

In my opinion, skinless dark meat, always. 

Bone in has more flavour, boneless is nice to eat. 

You can use breast meat, just make sure you are using lots of oil, butter or ghee to make up for the lack of fat. 

Use skinless chicken for curry, leaving the skin on changes the flavour and consistency of the gravy.

This is an ad.
Yellow chicken curry on a spoon with cauliflower rice in the background

Adjusting the Amount of Gravy

Some like lots of gravy with their curry, others like less but thicker curry, the choice is yours. 

For lots of gravy: Add water to cover the chicken in the pot, put the lid on and simmer until it’s time to add the cream. 

For a thicker gravy: Add water until it’s just below the top of the chicken, and leave a crack in the lid while simmering.

You’ll have to adjust the amount of salt you use to season depending how much water is added.

Adding the Cream

Don’t simmer the cream too long as it can break in the gravy. 

After the curry has simmered, and the gravy is to your liking, add the cream, stir, salt to taste, and simmer for 10-15 minutes on low.

Let the Curry Rest

It took me a while to figure this out but it makes sense. 

Letting the curry rest with the lid on and the heat off for at least 5 to 10 minutes drastically changes how tender the meat is and how the flavours distribute throughout the gravy. 

The oil will rise to the top of the gravy while resting, either mix it together before serving or mix it in the bowl while eating. 

It’s just like resting a steak, it makes the meat in the curry better.

This is an ad.


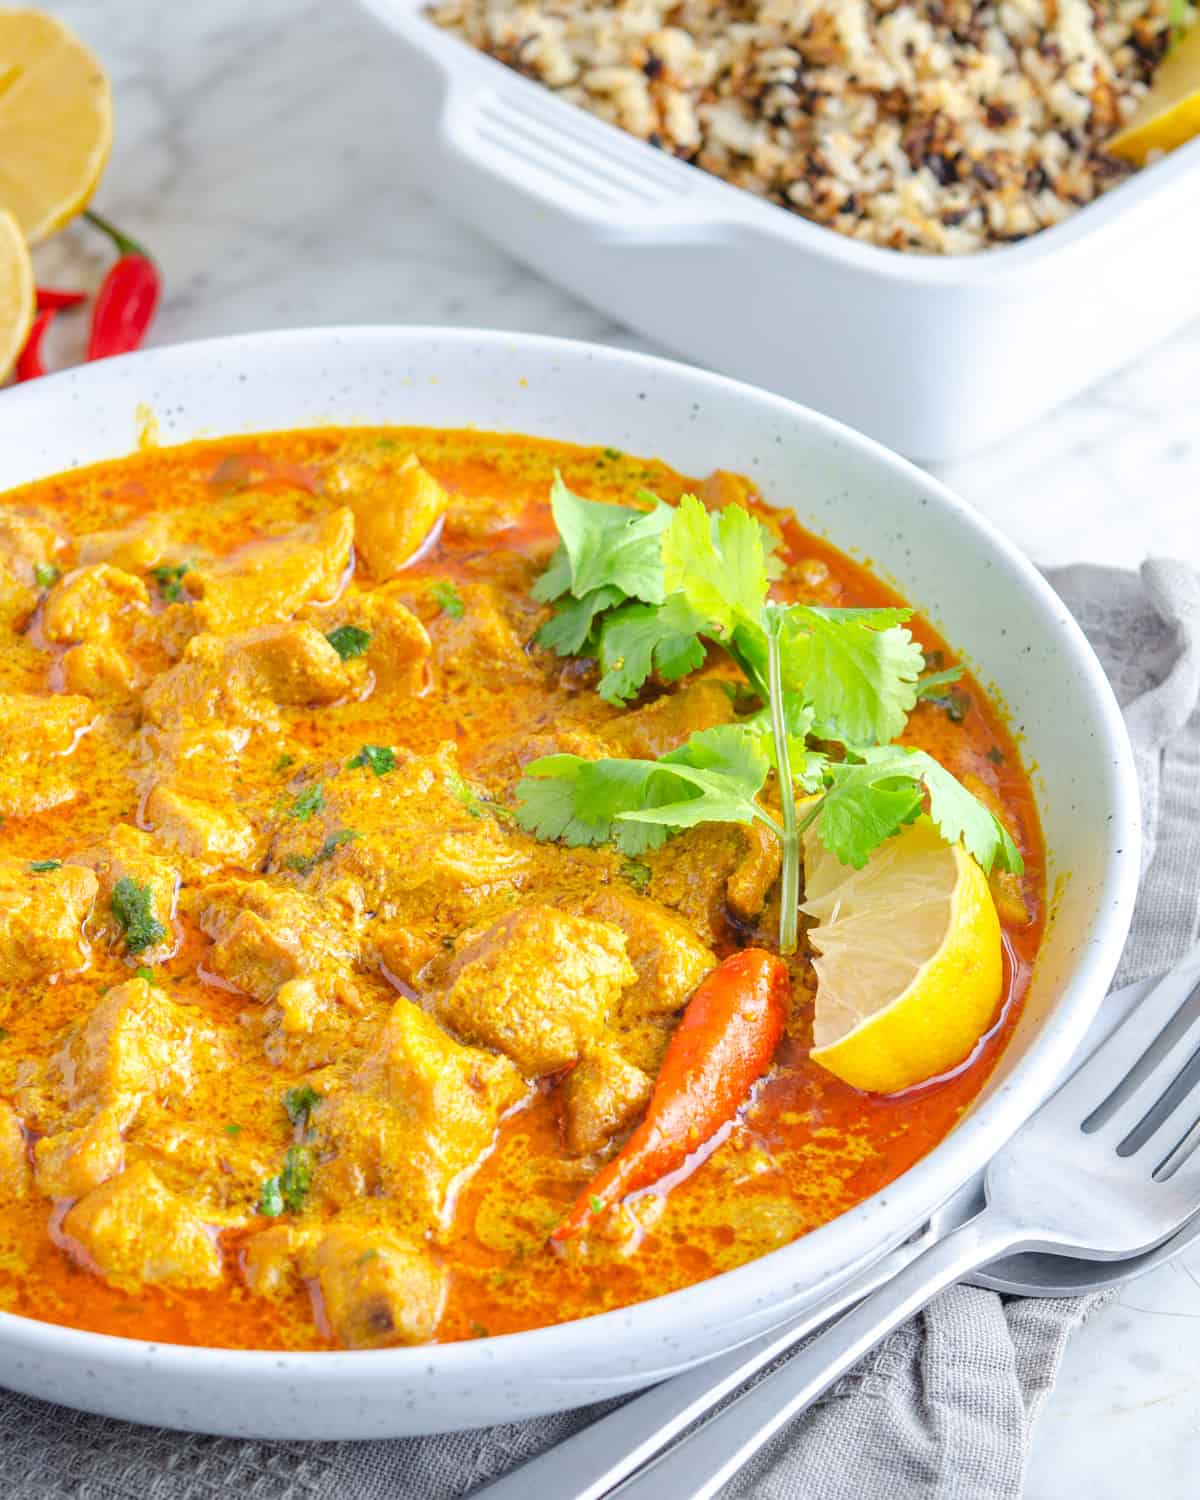
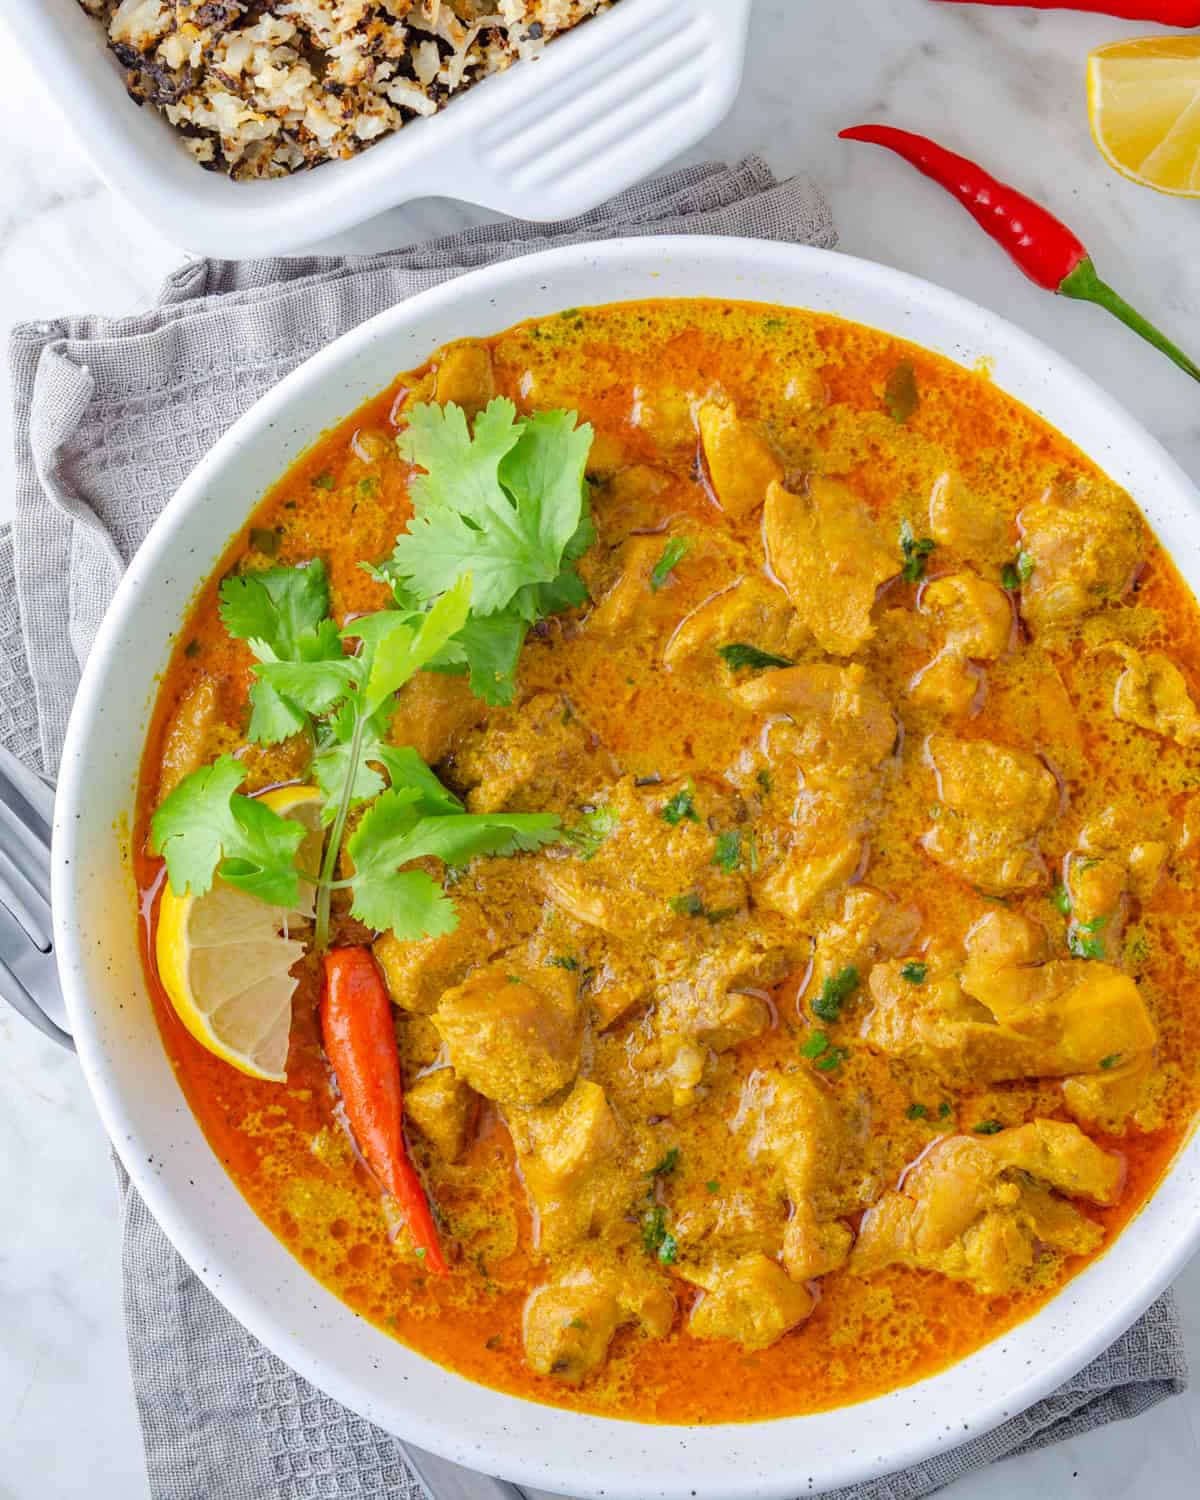
Yellow Chicken Curry (Low carb, Keto)

Yellow Chicken Curry In a white bowl with cauliflower rice in the background
Prep Time 20 minutes
Cook Time 1 hour 20 minutes
Servings 6 servings
Calories 433 kcal
Net Carbs 5.3 g
Rate this Recipe
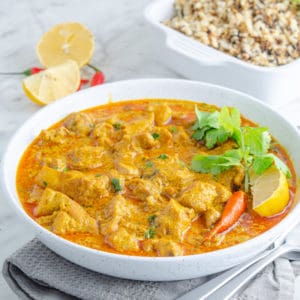
A simple Indian yellow chicken curry with common spices and ingredients. A great introduction to making curry, this Indian dish is full of authentic flavours and is low carb/keto friendly. Just 5.3g net carbs per serving.

IMPORTANT – There are often Frequently Asked Questions within the blog post that you may find helpful. Simply scroll back up to read them!

ad.

Equipment

  • Knife and Cutting Board
  • large pot with a lid or deep wok/frying pan with a lid

Ingredients
  

  • oil/butter/ghee for frying
  • 1 medium onion thinly sliced
  • 4 cloves garlic minced
  • 1 tablespoons ginger minced
  • 4 whole cardamom pods green or black
  • 3 tablespoons turmeric ground
  • ¼ teaspoon Kashmiri chili powder or cayenne
  • 1 tablespoon paprika
  • ½ cup water for water frying
  • 2 pounds chicken thigh skinless, bone-in or boneless
  • 2 whole hot chilies
  • 1 cup water for gravy
  • ½ cup cream
  • cilantro for garnish
  • salt and pepper to season

Instructions
 

  • Chop the onion, garlic, and ginger. Begin by thinly slicing the onion, and mincing the garlic and ginger.
    1 medium onion, 4 cloves garlic, 1 tablespoons ginger
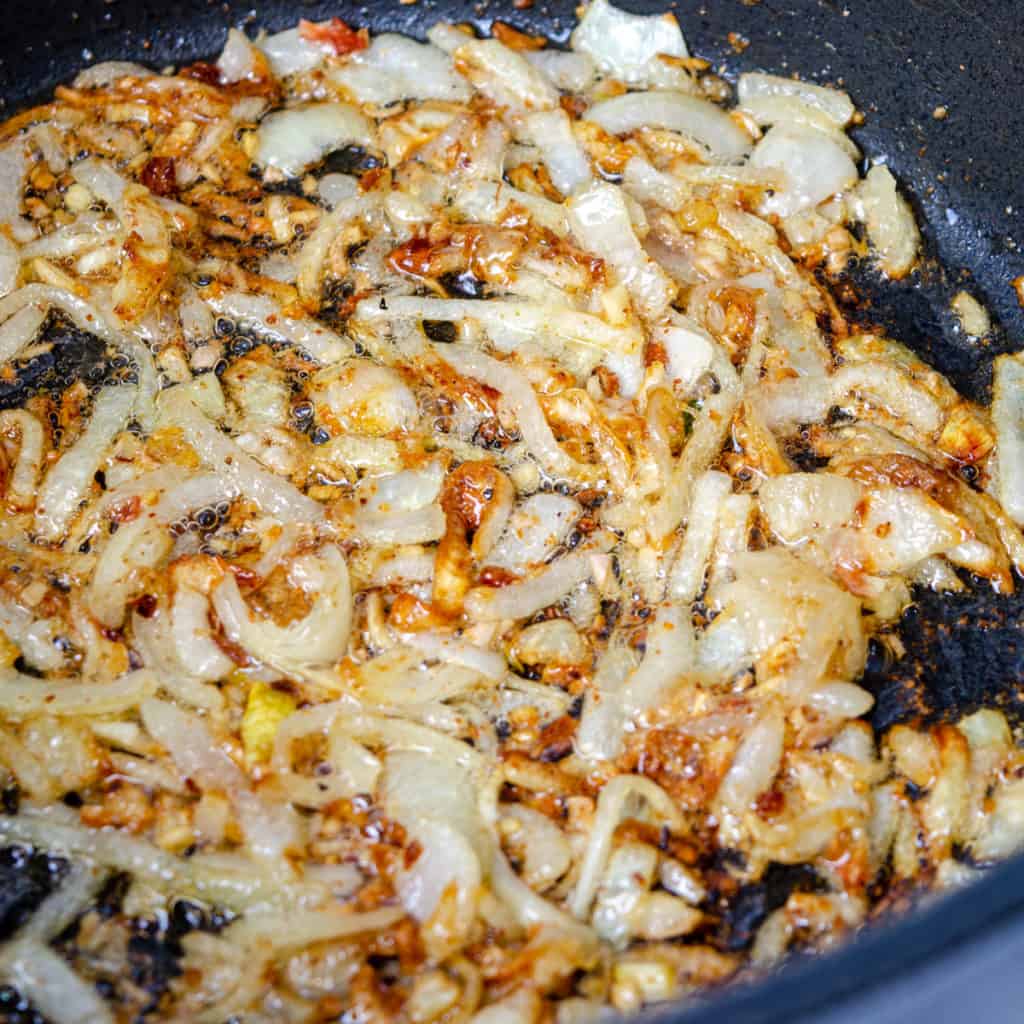
  • Fry in hot oil until browned. Heat plenty of oil/butter/ghee in a deep pot over medium heat. Once hot, add the sliced onion, garlic, and ginger, salt well and begin to fry. Keep frying until the onions are just browning on the edges, 5-8 minutes Stir occasionally and add oil as needed to prevent burning.
    oil/butter/ghee, 1 medium onion, 4 cloves garlic, 1 tablespoons ginger, salt and pepper
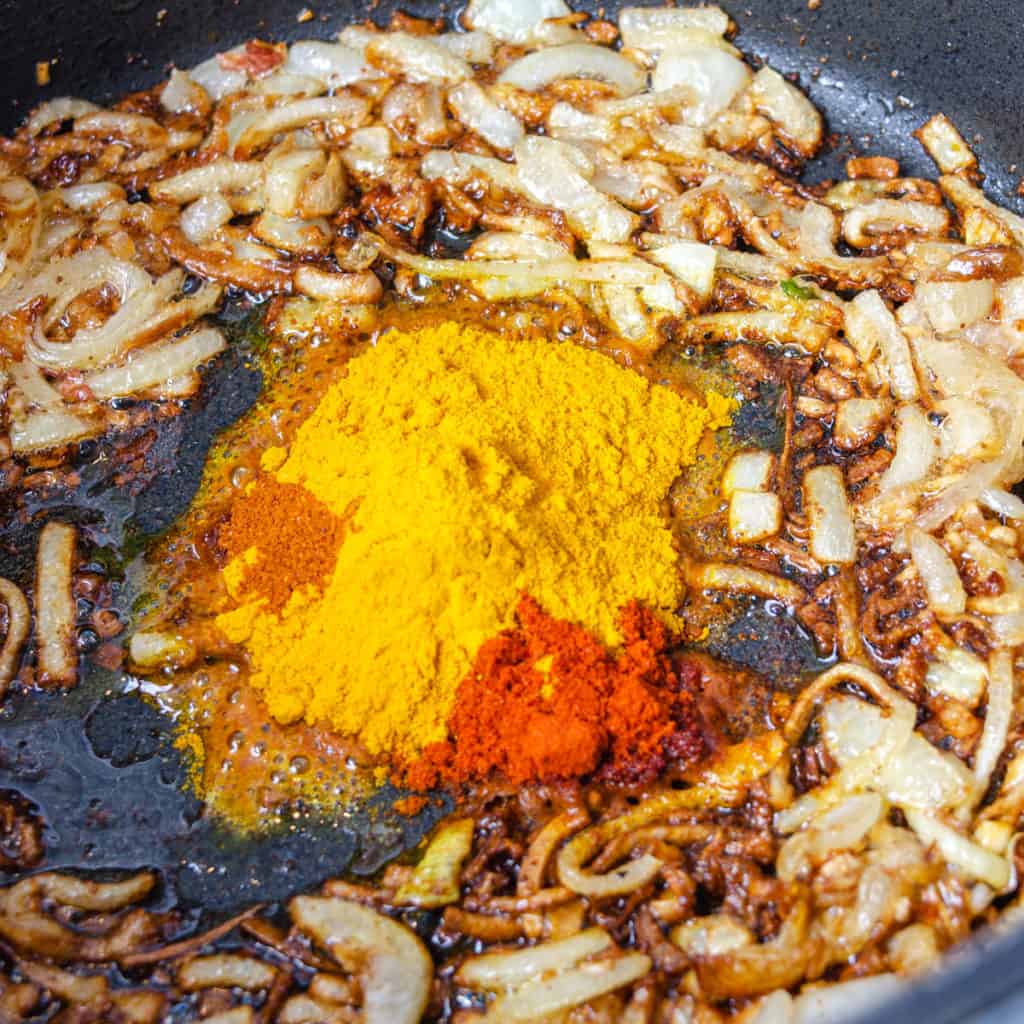
  • Add the spices to fry. Once the onions begin to brown, push them to the side of the pot to make a well and expose the bottom of the pot. If dry add oil and add the cardamom pods, turmeric, paprika, cayenne/chili powder, and salt to the well to cook. Fry the spices for 10-15 seconds and then mix everything in the pot together. Add oil once the pot becomes dry.
    4 whole cardamom pods, 3 tablespoons turmeric, ¼ teaspoon Kashmiri chili powder or cayenne, 1 tablespoon paprika, salt and pepper
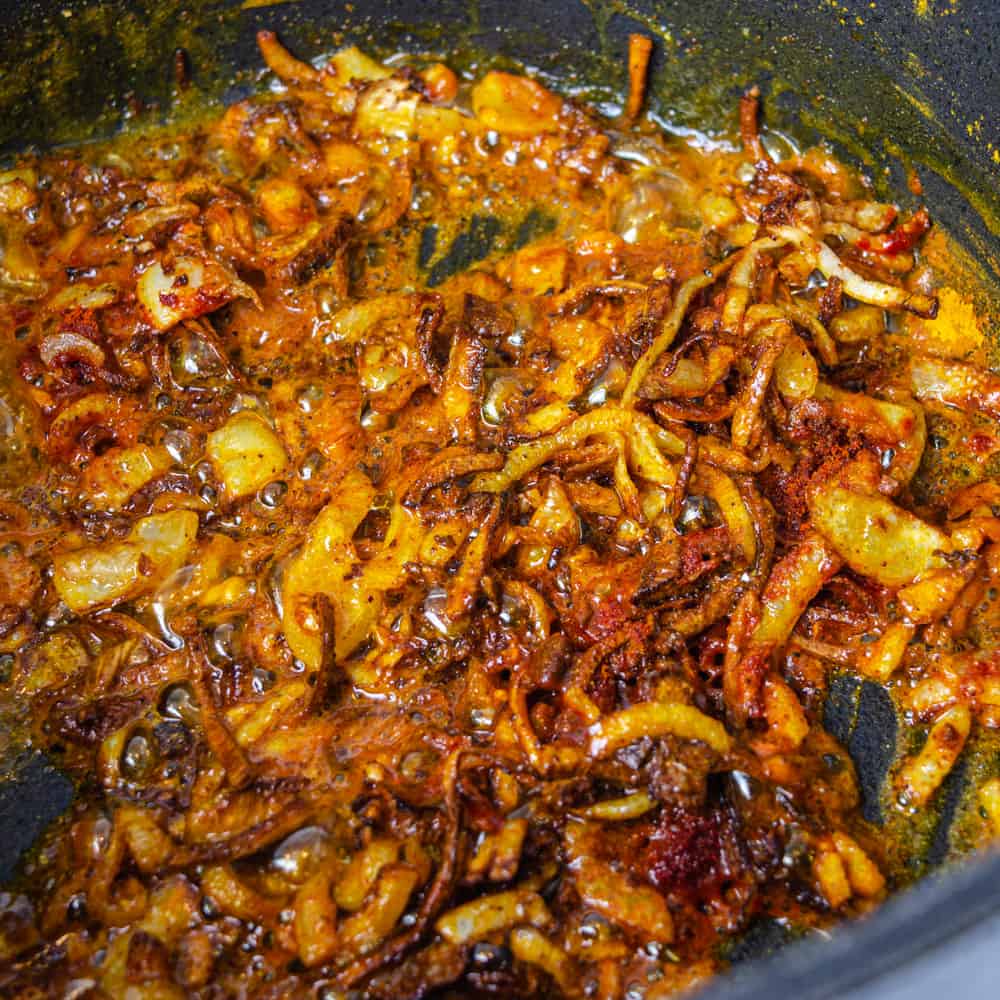
  • Water fry until a smooth paste forms. Add water to the pot 2-3 tablespoons at a time to water fry and breakdown the onions. Fry until all the water cooks off and then repeat the process by adding another 2-3 tablespoons of water to fry off again. Repeat this, stirring the onions, spices, and water around until a smooth paste forms.
    ½ cup water
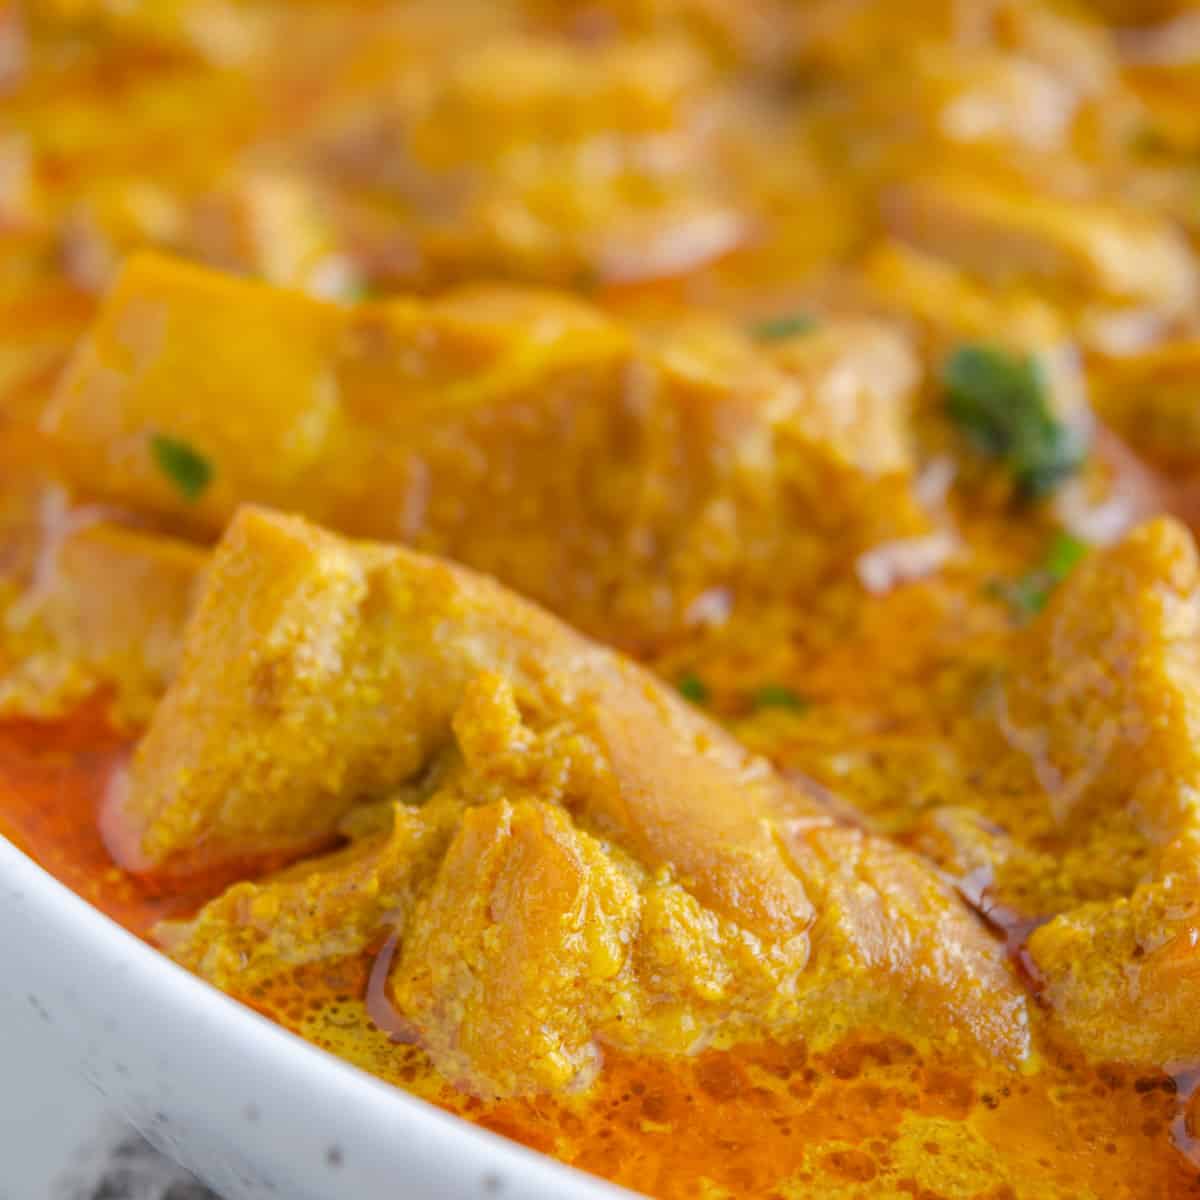
  • Add the chicken and cook. Add oil to the pot if necessary and add the chicken, salt well, and add the whole hot chilies. Cook the chicken until its cooked through and just starting to brown.
    oil/butter/ghee, 2 pounds chicken thigh, 2 whole hot chilies
  • Add water and simmer. Add water to the pot for the gravy, and bring to a rapid simmer. Lower the heat and cover with a lid simmering for at least 25 minutes. See notes for adjusting the amount of gravy
    1 cup water
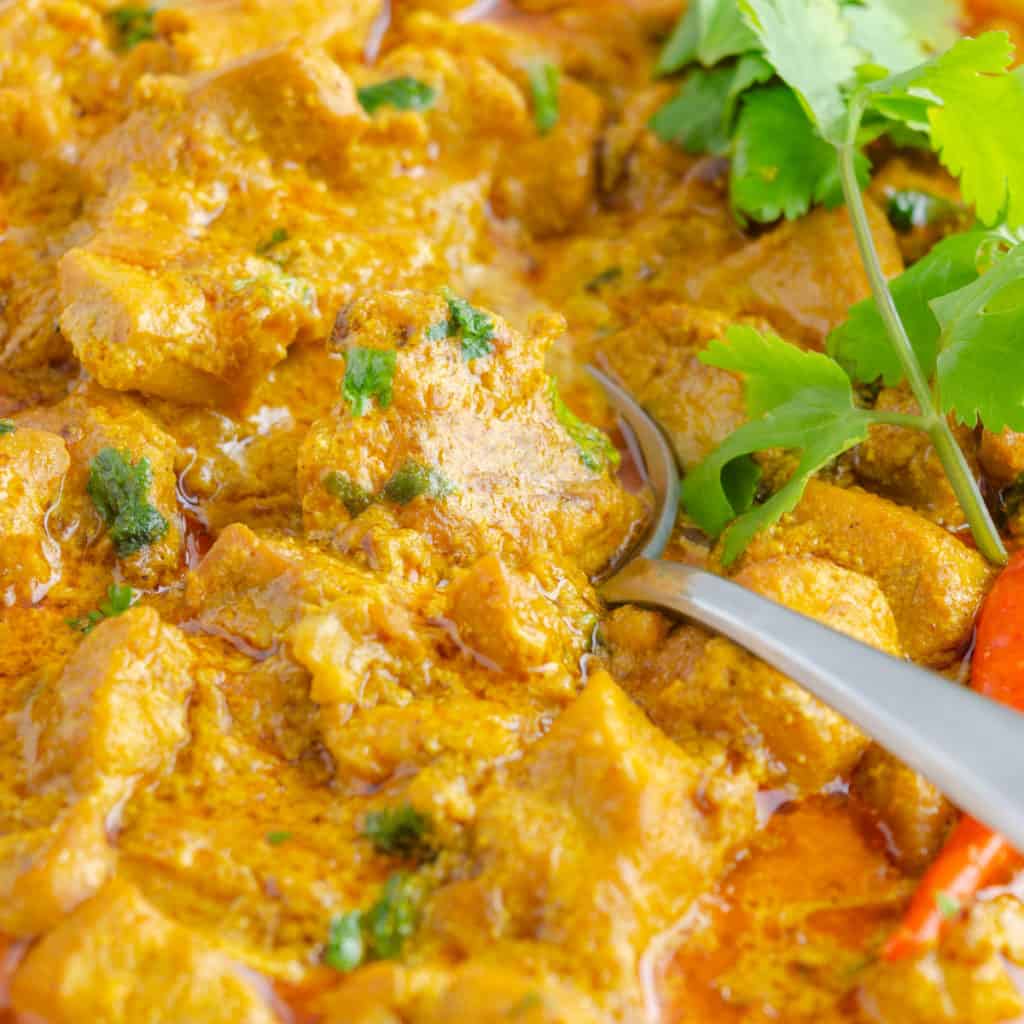
  • Add the cream and simmer gently. Lower the heat to a gentle simmer and add the cream. Stir to combine, cover with a lid, and simmer on low 15 to 20 minutes.
    ½ cup cream, salt and pepper
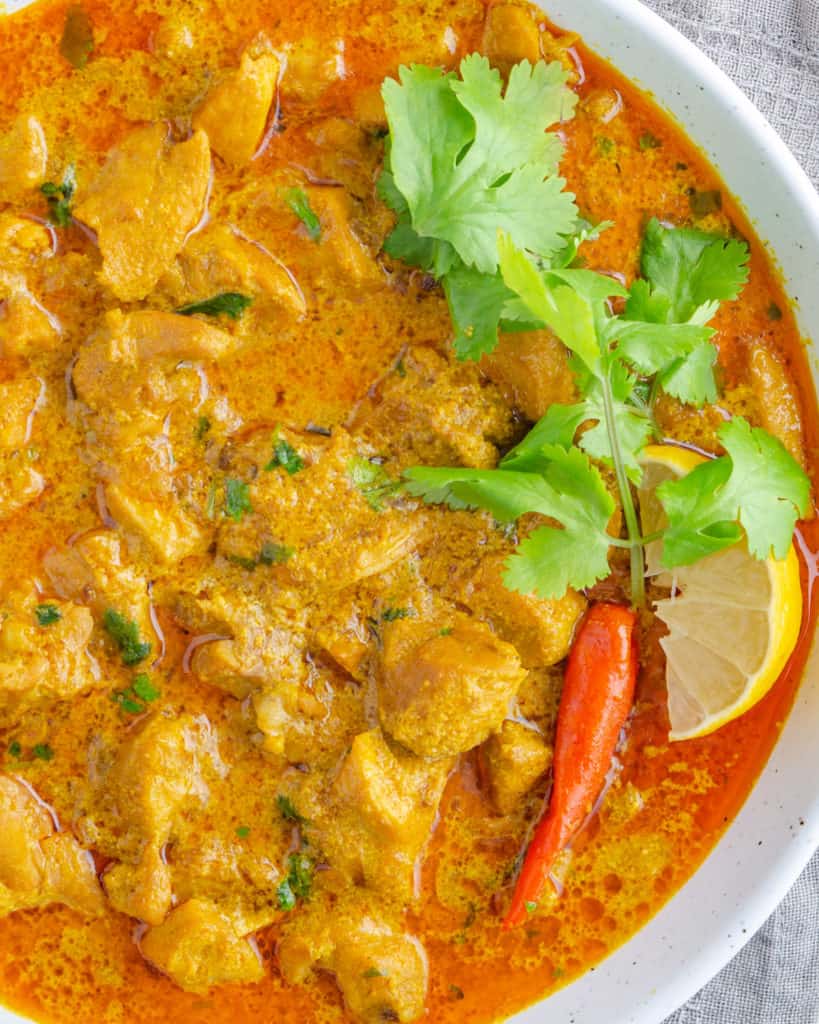
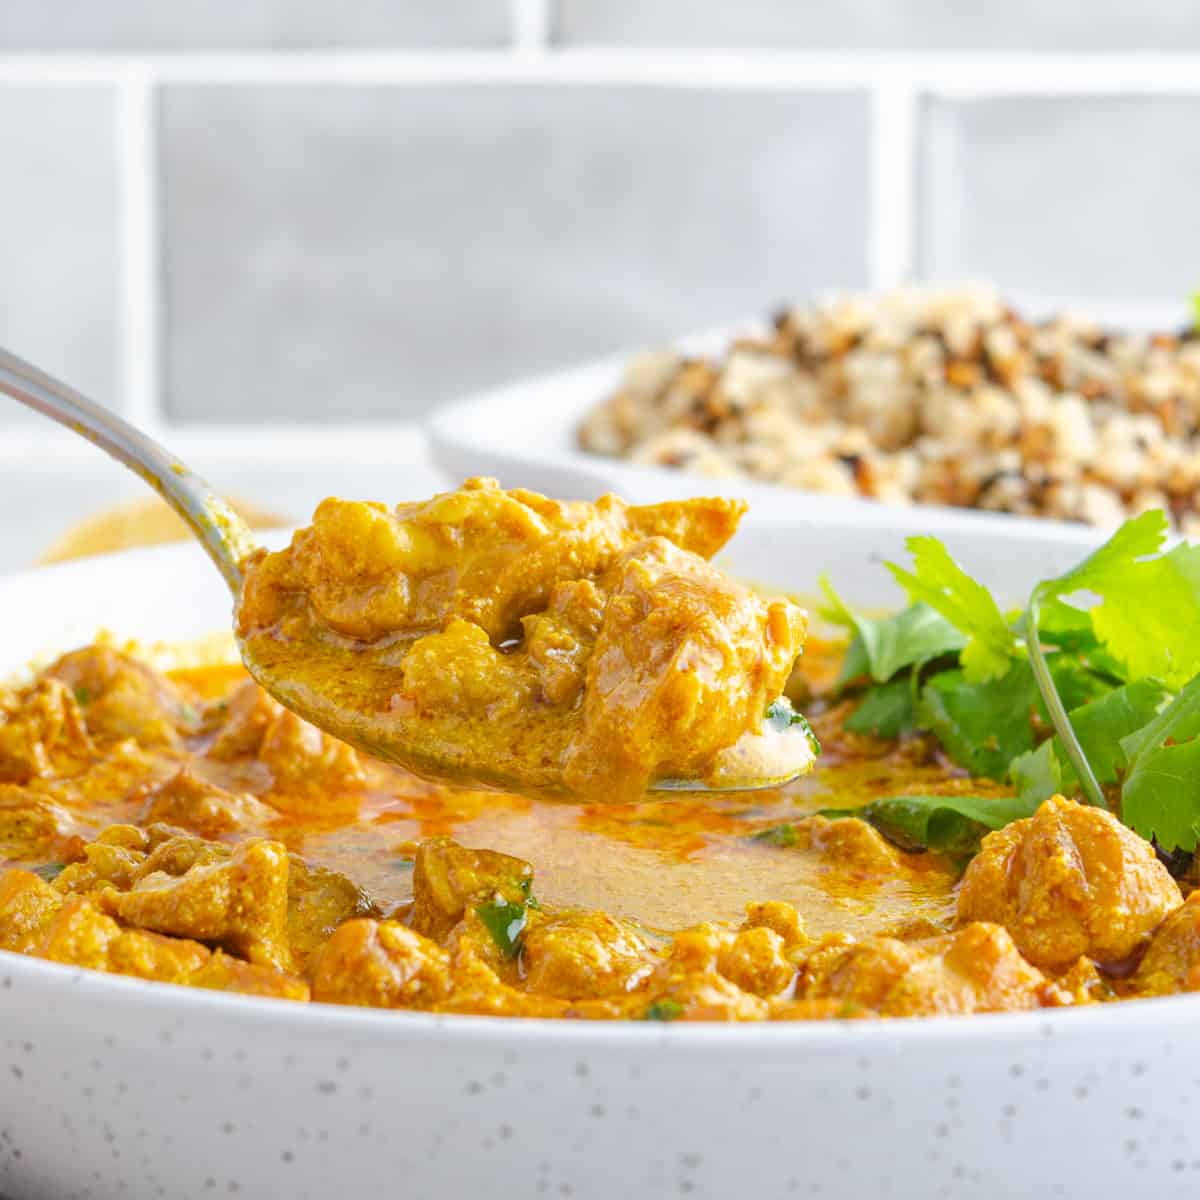
  • Rest the curry and serve. Allow the curry to rest with the heat off and the lid on for 5 to 10 minutes. Garnish with fresh cilantro, salt to taste, and serve with low carb cauliflower rice, or a vegetable bhaji.
    cilantro
ad.

Notes

For more details about any of the steps, jump to the "What you need to know" section now. 
For more thinner gravy: Add water to cover the chicken and simmer with the lid on tight. 
For less thicker gravy: Add water about halfway up the chicken and leave a crack in
t he lid while simmering. 
Dark meat chicken is the most flavourful and tender although chicken breast can be used as well. Use bone in or boneless and remove the skins before cooking. 

Nutrition

Calories: 433kcalCarbohydrates: 6.7gProtein: 44gFat: 25.3gSaturated Fat: 12.6gSodium: 560mgPotassium: 450mgFiber: 1.3gSugar: 1.6gVitamin A: 1300IUCalcium: 63mgIron: 4mgSugar Alcohols: 0.08gNet Carbs: 5.3g

Nutritional information is calculated using the recipe calculator and verified database available from Cronometer. Although every reasonable effort is made to provide accurate information this estimate is provided as courteously and convenience only. To obtain the most accurate representation of the nutritional information in any given recipe, you should calculate the nutritional information with the actual ingredients used in your recipe.

Try the free recipe calculator at Cronometer
Did you give this a try?Mention @yummyforadam or use #yummyforadam on instagram!
Looking for a different low carb recipe?Something you don't see here or looking for a low carb version of your favourite recipe? Let me know so I can get working on it! Contact me directly or leave a comment!
Keywords: desi keto recipe, keto chicken curry, low carb chicken curry
This is an ad.
Yellow chicken curry in a white bowl with a side of low carb cauliflower rice

What to Serve With Yellow Chicken Curry

With a gravy as rich and flavourful as this you need something to mop it all up. 

There are a few low carb Indian side dishes we commonly pair with curry. 

If you are used to eating Naan or paratha with your curry there are few good low carb options that are pretty close. 

Take your favourite low carb wrap or tortilla and fry it briefly in a fry pan to soften and then butter it. 

The two best low carb flatbread for replacing Naan or Paratha are

This is an ad.

Make Ahead, Reheating and Storage

Curry is an excellent make ahead or meal prep dish because the flavours improve over time.

Curry made the day before is the best curry.

Store in a sealed container in the fridge for use within a week. You can also freeze any leftovers which will last for many months. 

Curry makes an excellent heat and serve low carb freezer meal.

It’s best to use a snap-lock glass container for curry as the turmeric will stain plastic containers. 

Reheat on the stove, in a pot over medium-low heat until warmed through. 

You can also heat in the microwave as you would any leftovers just use a cover or paper towel to prevent splatter, turmeric is hard to clean!

Yellow chicken curry in a bowl from above

Quick Tips to Master This Recipe

  1. Don’t skimp on fat/oil, salt, or time. All three of these are crucial to any good curry. 
  2. COOK. YOUR. SPICES. ALWAYS. A quick temper takes less than half a minute and it’s all you need.
  3. Water fry until the spices and onions form a thick paste. This is the best way to start any curry.
  4. Season at every step with salt. Not just at the beginning and end. Every ingredient needs seasoning. Taste where appropriate to make sure it’s on point, don’t taste it when the chicken is raw.
  5. Let the curry rest before serving to let the flavours meld and the chicken to become soft and tender.

Enjoy!

Leave a Reply

Your email address will not be published. Required fields are marked *

Recipe Rating