Skip to content

Easy Dry Brine Turkey – A Full Guide

Dry brining is a method of treating a turkey with salt for an extended period of time prior to roasting to help increase the flavour a keep the meat moist while in the oven.

Unlike a regular brine or ‘wet brine’ this method is less messy, does not require a huge tub of water, takes up less space in the fridge, and leads to an equally delicious, if not better turkey than a traditional brine.

Make a fully low carb turkey dinner this holiday by pairing this succulent turkey with these low carb sides!

Mash: Roasted Cauliflower Mash

Stuffing: Sausage and Cauliflower ‘Stuffing’

Side dish: 10 Layer Cheesy Keto Casserole

SHARE THIS NOW.

Yum

SERIOUSLY, DO IT.

How To Dry Brine Turkey TL;DR

  • Prepare a full batch of the dry rub by combining ½ to 1 cup of salt with any dry herbs or spices you like such as dried rosemary, parsley, black pepper, and celery salt. Any leftovers can be saved as long as they don’t come in direct contact with the raw meat. 
  • Use your hands to loosen the turkey skin and pull it away from the meat. Liberally coat the turkey with the dry rub both on top and underneath the skin. When it doubt, add more, some will fall off just get a nice coating on there. 
  • Place a baking rack on a tray to help keep the turkey elevated off the tray and place uncovered in the fridge for 2-3 days. The tray will catch any liquid that drains off during the brining process.
  • Remove the turkey from the fridge 1 hour before cooking to warm to room temperature and discard any liquid in the tray. Do NOT wash the dry rub off the roast.
  • Prepare the turkey for roasting and cook as you would any other turkey.
This is an ad.

Jump to Section

Dry brined turkey with crispy skin, sliced on a tray

Why Brine a Turkey at all?

Brining a turkey is an absolutely crucial step to achieving a good tasting bird. If you have ever suffered through a dreadfully dry and tasteless holiday turkey, it probably wasn’t brined properly.

Turkey itself is very lean and needs some help in the flavour and moisture department. An un-brined turkey is a dry and falvourless one.

Dry Brine vs. Wet Brine

Traditionally a wet brine is used on whole chickens and turkeys. This involves submerging the entire bird in a solution of salt, water, and sometimes sugar for multiple hours or even days to get the flavour all the way through. 

A dry brine works in a similar way, except there is no added water involved. You cover the turkey in a thick coating of salt and seasonings, and leave it uncovered in the fridge for multiple days to let the salt do it work. 

Both methods work effectively, I just find that a dry brine works a little better, it’s easier to do, and you don’t need a huge bag or tub of water to sit the turkey in. I started preparing turkey this way when I was in an apartment because I had a small fridge and no massive bucket was fitting in there.

This is an ad.

How Does a Dry Brine Work

I won’t pretend to know all the science behind it, but here is my understanding of how dry brining works from some basic googling. 

The salt sits on the meat in the fridge for many days. During this time, the salt draws moisture out of the meat which then mixes with all the salty goodness you coated the meat in, creating a brine solution.  

Over time this brine soaks back into the meat, penetrating it deeper the longer it sits imparting the turkey with all the flavours of the brine. Some of this moisture will fall to the catch pan below, this will be discarded later. 

No fancy injections or techniques involved, just cover it in salt and let it sit.

What you are left with is a turkey that is flavourful and juicy to the last bite!

Have you Seen my latest Helpful post?

Are you craving fruit? 

Feeling like you can’t enjoy any fruit on your low carb diet?

I got you covered, here is a comprehensive list of keto friendly fruits under 10g net carbs per serving!

Find a low carb fruit now !

The Benefits of a Dry Brine

  • The flavours of the brine penetrate the meat and every bite is perfectly seasoned and juicy. No dry white meat! 
  • Takes up less space and is less of a mess than a wet brine, while being equally if not more effective
  • Couldn’t be more simple, you are just rubbing meat with lots of salt and letting it sit 
  • The inside stays juicy and the outside gets a nice crust after cooking
  • You can dry brine a partially frozen turkey if need be
  • The salty drippings make a lip smacking au jus or gravy!
  • This recipe is low carb, keto, and semi-carnivore friendly!

Dry Brining Turkey FAQ

Below is a deep dive into the key details of this recipe, for a full set of directions and ingredients on how to make a dry brined roast beef jump ahead to the recipe card now!

A 3 day dry brine turkey on a black baking rack
This turkey has been dry brining for 3 days

Does a dry brine make the turkey super salty?

Amazingly it does not! It actually perfectly seasons the meat. The liquid that falls to the pan in the fridge however is very salty and contains meat runoff that should be discarded.

My turkey smells bad after dry brining, is that normal?

No, a properly dry brined turkey should smell like a normal turkey. The liquid that falls to the pan may smell a little different but it should not smell rancid. 

If your turkey smells rancid or bad, do not take a chance, discard your turkey. 

I have cooked a dozen turkeys with this method and never had a bad smelling turkey. 

Can you stuff a dry brined turkey?

You can stuff your turkey like you would a regular turkey AFTER you are finished brining it and before you roast it. 

DO NOT stuff your turkey before brining. 

What type of salt is used in a dry brine?

The best type of salt for a dry brine is coarse grind salt and flaked salt. Flaked Kosher salt is my go to for all cooking as I find it tastes the best. 

However, regular old sea salt or table salt will work fine. 

You do not need (and should not use) curing salt (aka pink curing salt/Prague powder) for a dry brine.

How much salt is needed to dry brine a turkey?

There are some general rules of thumb about how much salt per pound you need, but I never follow them

Around 1 tablespoon per pound of meat will give you pretty good coverage for most roasts.  

However, there is always a lot that falls to the pan or cutting board when applying the brine so it’s better to have extra. 

I usually start with between ½ cup to 1 full cup of salt for turkey, mixed with some seasonings and make a full bowlful of dry brining rub.

Any extra I use for something else, It’s just salt and spices, as long as it doesn’t come in contact with the raw meat it will last a long time.

What Seasonings Can Be Added To The Salt?

Whatever dry seasonings you like! 

For a turkey I like to stick to traditional flavours like:

  • Black pepper
  • Celery salt
  • Thyme
  • Rosemary
  • Parsley
  • Sage
  • Garlic


How Long Does A Dry Brine Take?

The amount of time you dry brine something will depend on the type of meat, and the size. 

For really a full turkey you’ll want to dry brine for a minimum 48 hours, but preferably 72 hours.

Do You Cover The Meat While Dry Brining?

No.

Leave it uncovered in the fridge. There are 2 main reasons for this. 

First, you don’t want to trap moisture between the meat and the cover, it can turn rancid and ruin the brine, you want the extra liquid to drain to a catch pan below. 

Second, leaving the meat exposed helps dry the outside of the turkey which will lead to a better crust and a crispier skin in the oven. 

You’ll also want to elevate the turkey off the catch pan a little bit with a baking rack or something similar so it is not sitting in the liquid on the pan.

Do You Wash The Brine Off Before Cooking?

Absolutely not!

There will be a considerable amount of liquid that drains out of the meat into the catch pan below, that is the only part you need to discard. 

Leave the dry brine on the meat and cook it that way!

Do You Add More Salt To A Dry Brined Roast?

You don’t need to add any additional salt to the turkey after a dry brine. The brine will perfectly season the turkey.

Careful with adding any additional seasonings or rubs, especially store bought ones that contain salt as it can make the meat too salty.

Where does the salt go on the turkey?

Everywhere! Even under the skin!

Before brining, work your hands under the skin to separate the skin from the meat leaving as much of the skin intact as possible. 

Coat the meat directly with the brine under the skin, and also on top of the skin.

How thick should the salt layer be?

You don’t want a crazy thick layer of salt like a shield around the meat, just apply very liberally, probably more than you think you need. It’s unlikely to be too salty.

Can I dry brine a frozen turkey?

A fully frozen turkey is tough because the outside is very hard and the skin is frozen so the brine likely won’t stick. But if the turkey is partially frozen you can start the dry brine as long as the outside is a little soft.

This is an ad.
Food photography- Golden brown crispy skin on a dry brine turkey with lemons and rosemary

Cooking The Turkey

Prepare for roasting

When it’s finally time to cook the turkey you’ll want to remove it from the fridge around 1 hour before roasting bring up the temperature.  

Again, DO NOT wash off the brine that’s left on the meat, just discard any liquid that fell to the pan. 

Pre-basting the turkey

While the brine already leads to an insanely juicy and flavourful turkey, there is one extra step I like to take to create the most wonderfully moist and tender turkey. I slather the entire thing in mayo….yes mayo. 

Before you doubt me, the winner of the Final Table, Chef Timothy Hollingsworth did this on the show, and the judge praised him for how good the turkey was.

Add some mayo to a bowl to avoid contamination, and using your hands slather the entire turkey with mayo, both under the skin and on top. 

This mayo will melt and the fat will seep into the turkey keeping it rich and moist while it cooks similar to basting. 

If you have an aversion to using mayo, you may also use butter in its place. Both will also create wonderful drippings that will create a delicious gravy!

A raw dry brined turkey covered in mayo on a tray
If you look closely you can see the mayo under the skin over the breast meat

Arrange the Turkey for Roasting

Take the wings of the turkey, bend the points down below the back and tuck them underneath, pushing the tips towards the center. This helps prop the turkey up off the pan. You can tie them in place with twine if needed. 

Take the legs and tie the boney ends together with twine. 

You may also use a baking rack underneath the turkey to keep it off the pan but it’s not necessary. 

Pour 2 cups of water, broth, or white wine into the bottom of the pan before roasting for added moisture, and extra drippings for the gravy.

This is an ad.

Turkey Oven Roasting Times, and Temperatures

Cooking Temperature: 425°F [220°C] for 20 minutes, dropped to 325°F [160°C] for remaining time

Cooking Method: Hot Oven 

Cooking Time: 12-13 minutes per pound for unstuffed, 15 minutes per pound stuffed. Cook uncovered.

For Crispier Skin:  Broil on high for 2-3 minutes before removing from the oven to crisp the skin. 

You Know its Done When: The internal temperature is at least 165°F [74°C]

Resting Time: 30-45 minutes uncovered (Don’t forget to account for resting time when determining when to start you turkey)

Tip:  Set a timer for 75% of your calculated cooking time and use a meat thermometer in the thickest parts of the thighs and the breast to check the internal temperature. Sometimes turkeys cook faster than others!

Don’t rely solely on time, get a meat thermometer and check to make sure that turkey is cooking!

Food photography - perfectly cooked turkey with crispy skin

Turkey Roasting FAQ

Should I roast covered or uncovered?

I always roast my turkey breast side up, uncovered, so the skin gets nice and golden brown. 

Can I stuff the turkey?

Yes you can! You will need to increase the cooking time per pound to get the cook just right. Or you can make my low carb stovetop sausage stuffing recipe and not worry about it! 

Why does the oven start off at a higher temperature?

A turkey is pretty big, it’s almost as big as the space in my oven. Adding a large cold or room temperature turkey to an oven can cool it down rapidly and change the cooking time. Starting the oven at a high temperature prevents too much cooling, and starts the skin off on a path to crispness!

What do I cook the turkey on?

Use a roasting pan or any pan with high sides. There is a lot of liquid that runs off a turkey and you don’t want that spilling into the oven or spilling onto your arms when you are carrying it.

Do I need to tie the turkey?

No, but it can help it cook evenly. I like to tuck the wings underneath to prop up the front, and then tie the legs together at the ends before cooking. 

Do I need to baste the turkey?

You can, but you don’t need to. The brine and the mayo layer takes care of most of it. If you baste the skin while roasting it will be less crispy, your choice.

Sliced dry brined turkey with juicy meat
This is an ad.

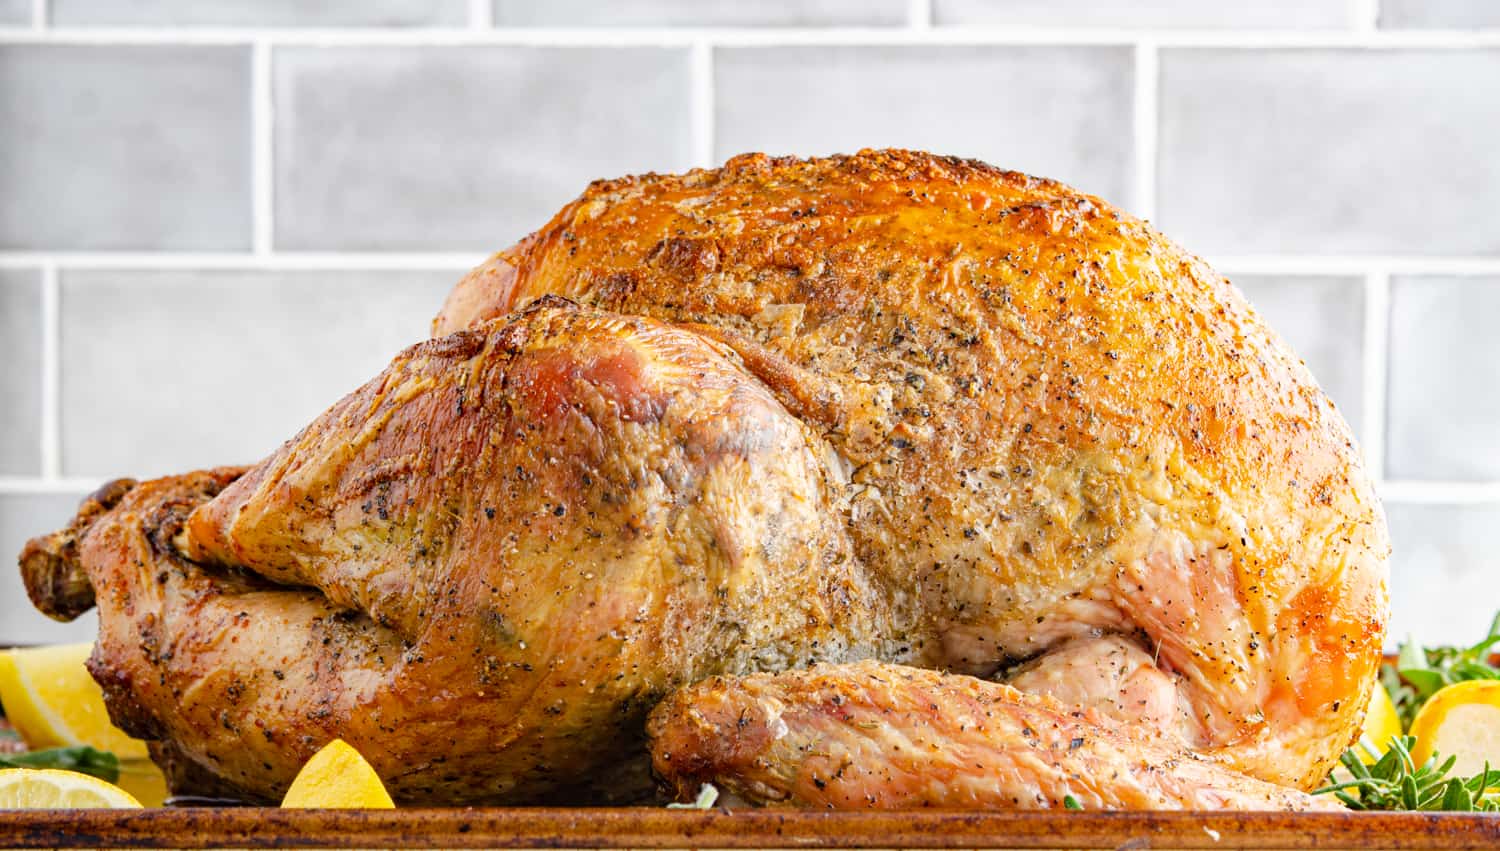
The Best Dry Brine Turkey Recipe

Sliced dry brine turkey on a tray garnished with lemons and losemary
Prep Time 1 hour
Cook Time 4 hours
Brining Time 3 days
Total Time 3 days 5 hours
Servings 12 servings
Rate this Recipe
Everything you need to know to dry brine your turkey to juicy flavourful perfection. A 3 day dry brine, a coating of mayo or butter, and roasted until the skin is crispy and golden brown, while the meat is juicy, tender, and flavourful.

IMPORTANT – There are often Frequently Asked Questions within the blog post that you may find helpful. Simply scroll back up to read them!

ad.

Equipment

  • 1 baking sheet/Drip tray Larger than the turkey to catch drippings
  • 1 Cooling rack to elevate turkey off the pan
  • 1 roasting pan with high sides
  • butchers twine optional

Ingredients
  

  • 1 large turkey (12-13 pounds) or 1 pound per person
  • Dry Brine Rub recipe below
  • 1 cup mayo or softened butter
  • 2 large lemons halved
  • 2 small onions quartered
  • 4 cloves garlic halved
  • 5 cup broth/white wine/water

Dry Brine Rub

  • 1 cup salt coarse or flaked
  • ½ teaspoon thyme dried
  • 1 tablespoon rosemary dried
  • 1 tablespoon black pepper ground
  • 1 tablespoon parsley dried
  • ½ teaspoon celery salt

Instructions
 

Brining the turkey

  • Prepare the dry brine rub. In a small bowl, mix together the salt, thyme, rosemary, black pepper, parsley, and celery salt until well combine. Set aside.
    1 cup salt, ½ teaspoon thyme, 1 tablespoon rosemary, 1 tablespoon black pepper, 1 tablespoon parsley, ½ teaspoon celery salt
  • Separate the skin from the turkey. Find a spot on the turkey where you can begin pulling the skin away from the meat. Begin working your hand between the skin and the meat. Take your time, moving slowly to separate (but not remove) the skin from the turkey meat on the breasts and legs. The goal is to create a space under the skin to add seasoning. You'll probably have to get your whole hand between the meat and the skin.
    1 large turkey (12-13 pounds)
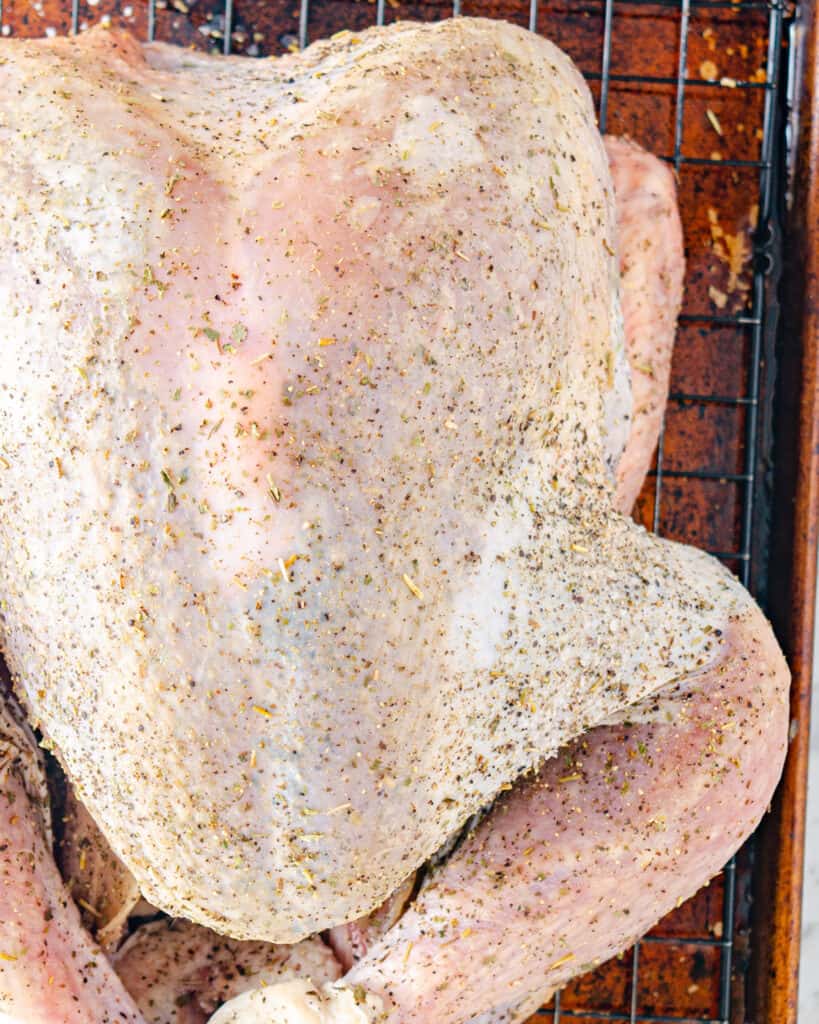
  • Rub the dry brine on the turkey. Liberally apply the dry brine mixture to every inch of the turkey under the skin and on top. Massage the brine into the meat as you work around the turkey. When in doubt add more brine.
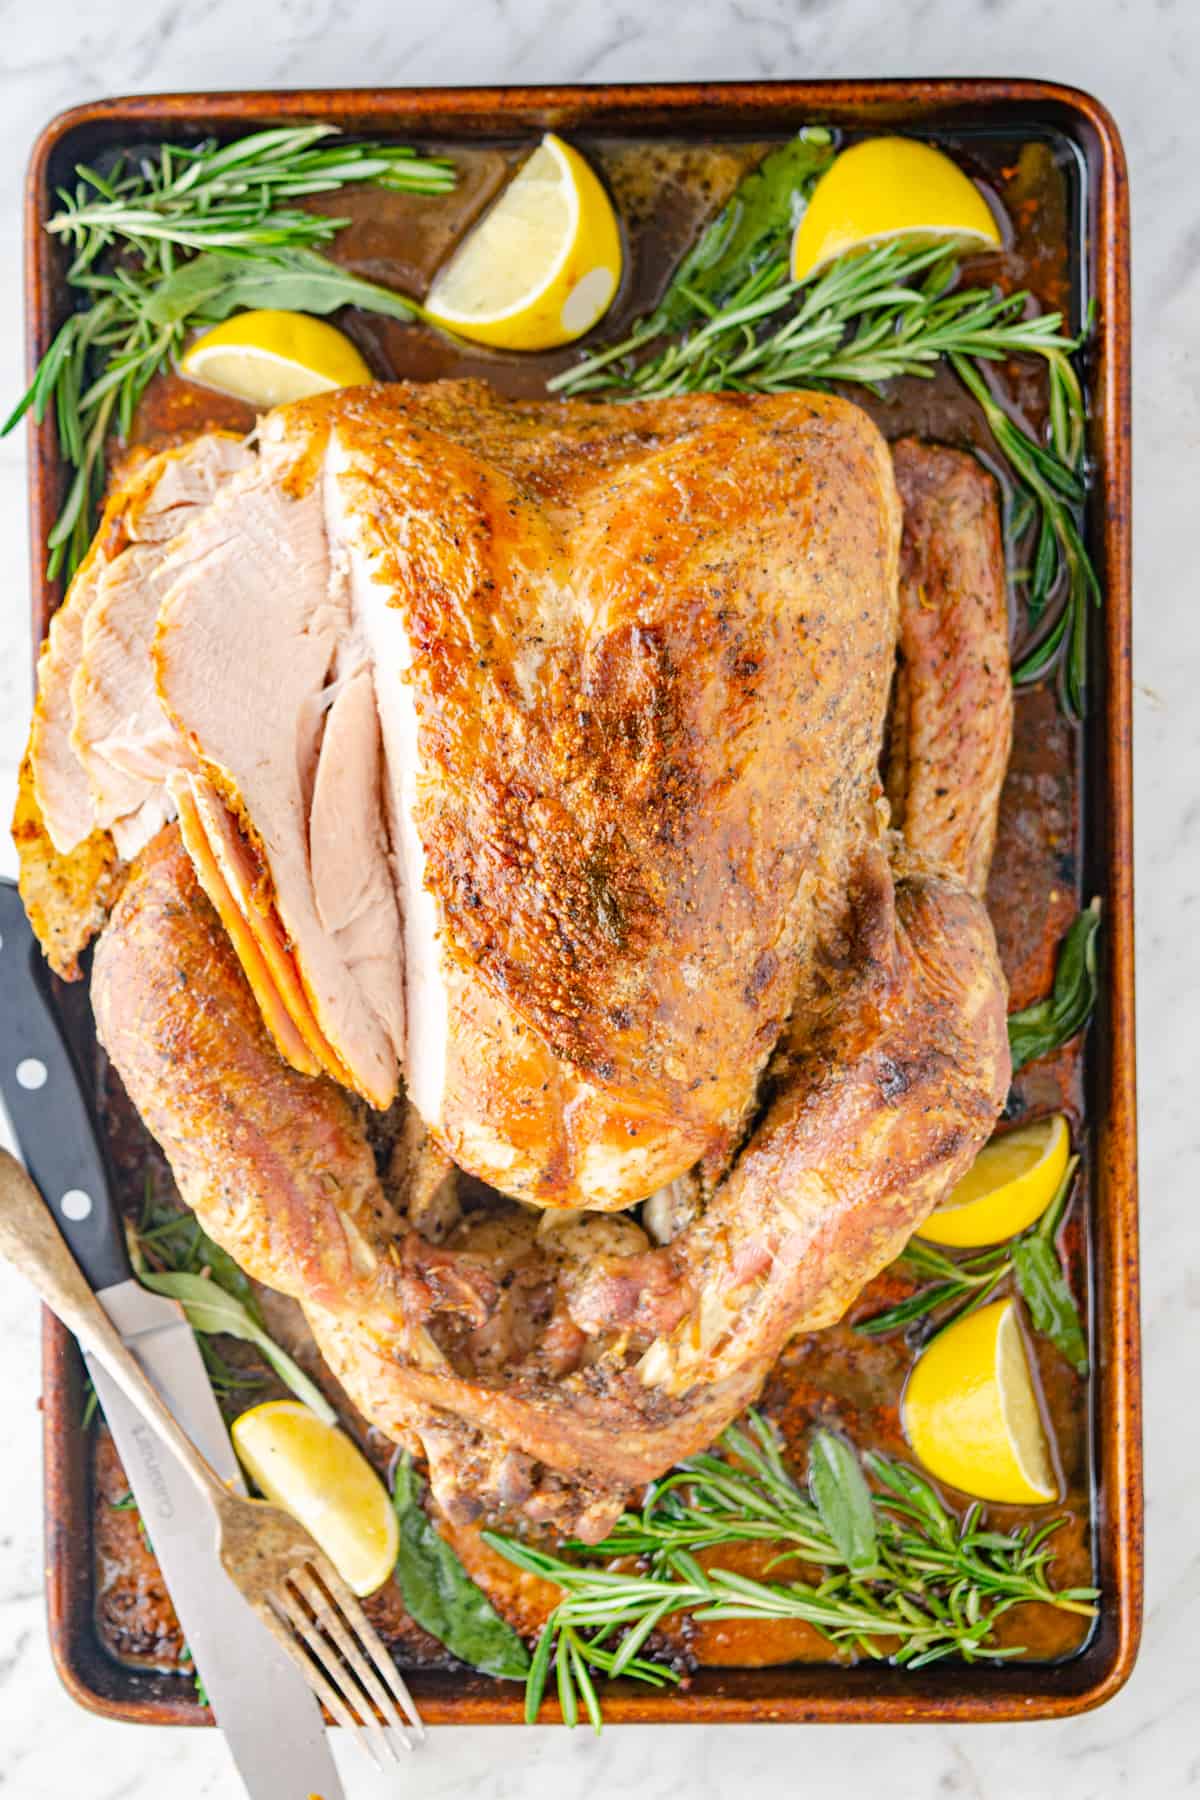
  • Refrigerate uncovered for 2-3 days. Place a baking rack over a large baking pan to elevate the turkey while the pan catches the run off. Place the turkey on top and refrigerate uncovered for 2-3 days. Once finished the skin should look dry to the touch.

Cooking the turkey

  • Remove the turkey from the fridge 1 hour before cook time.
  • Pre-heat oven to 425°F
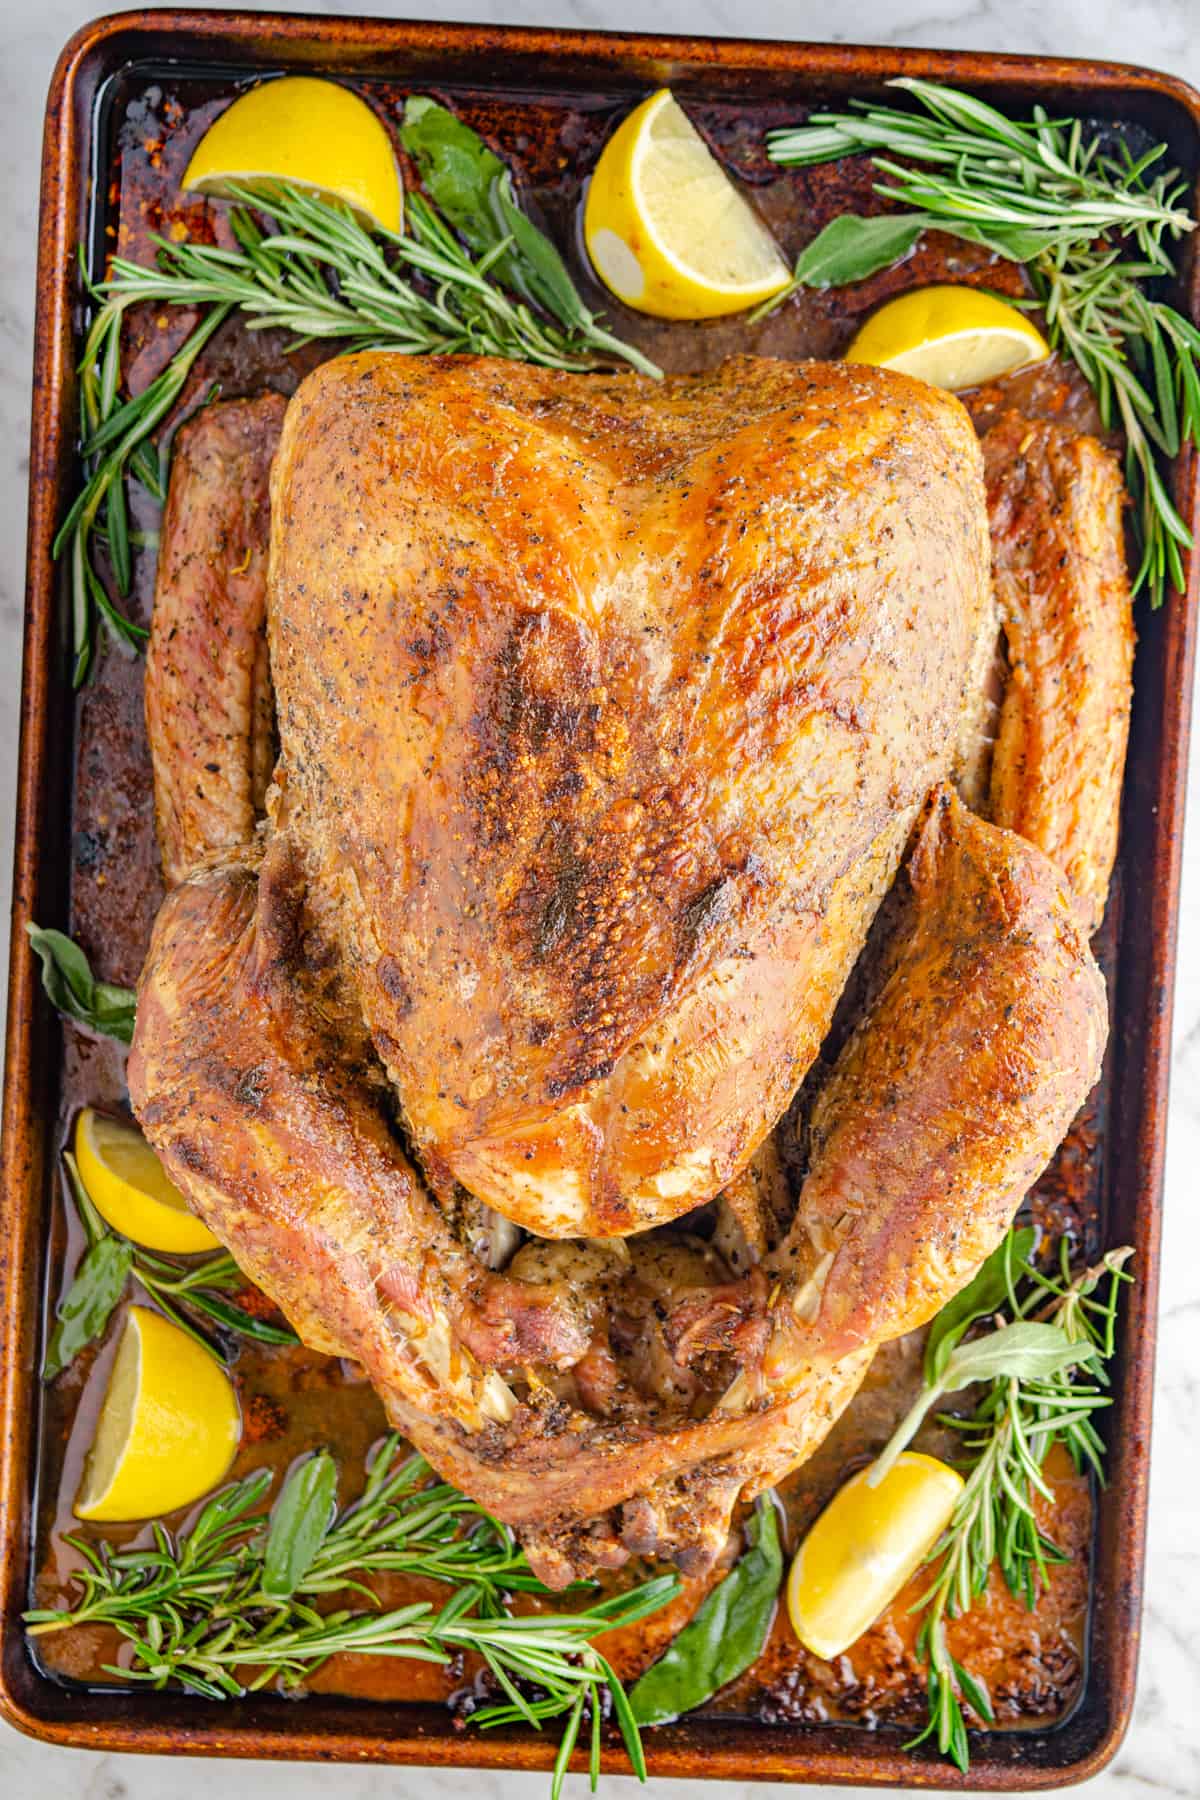
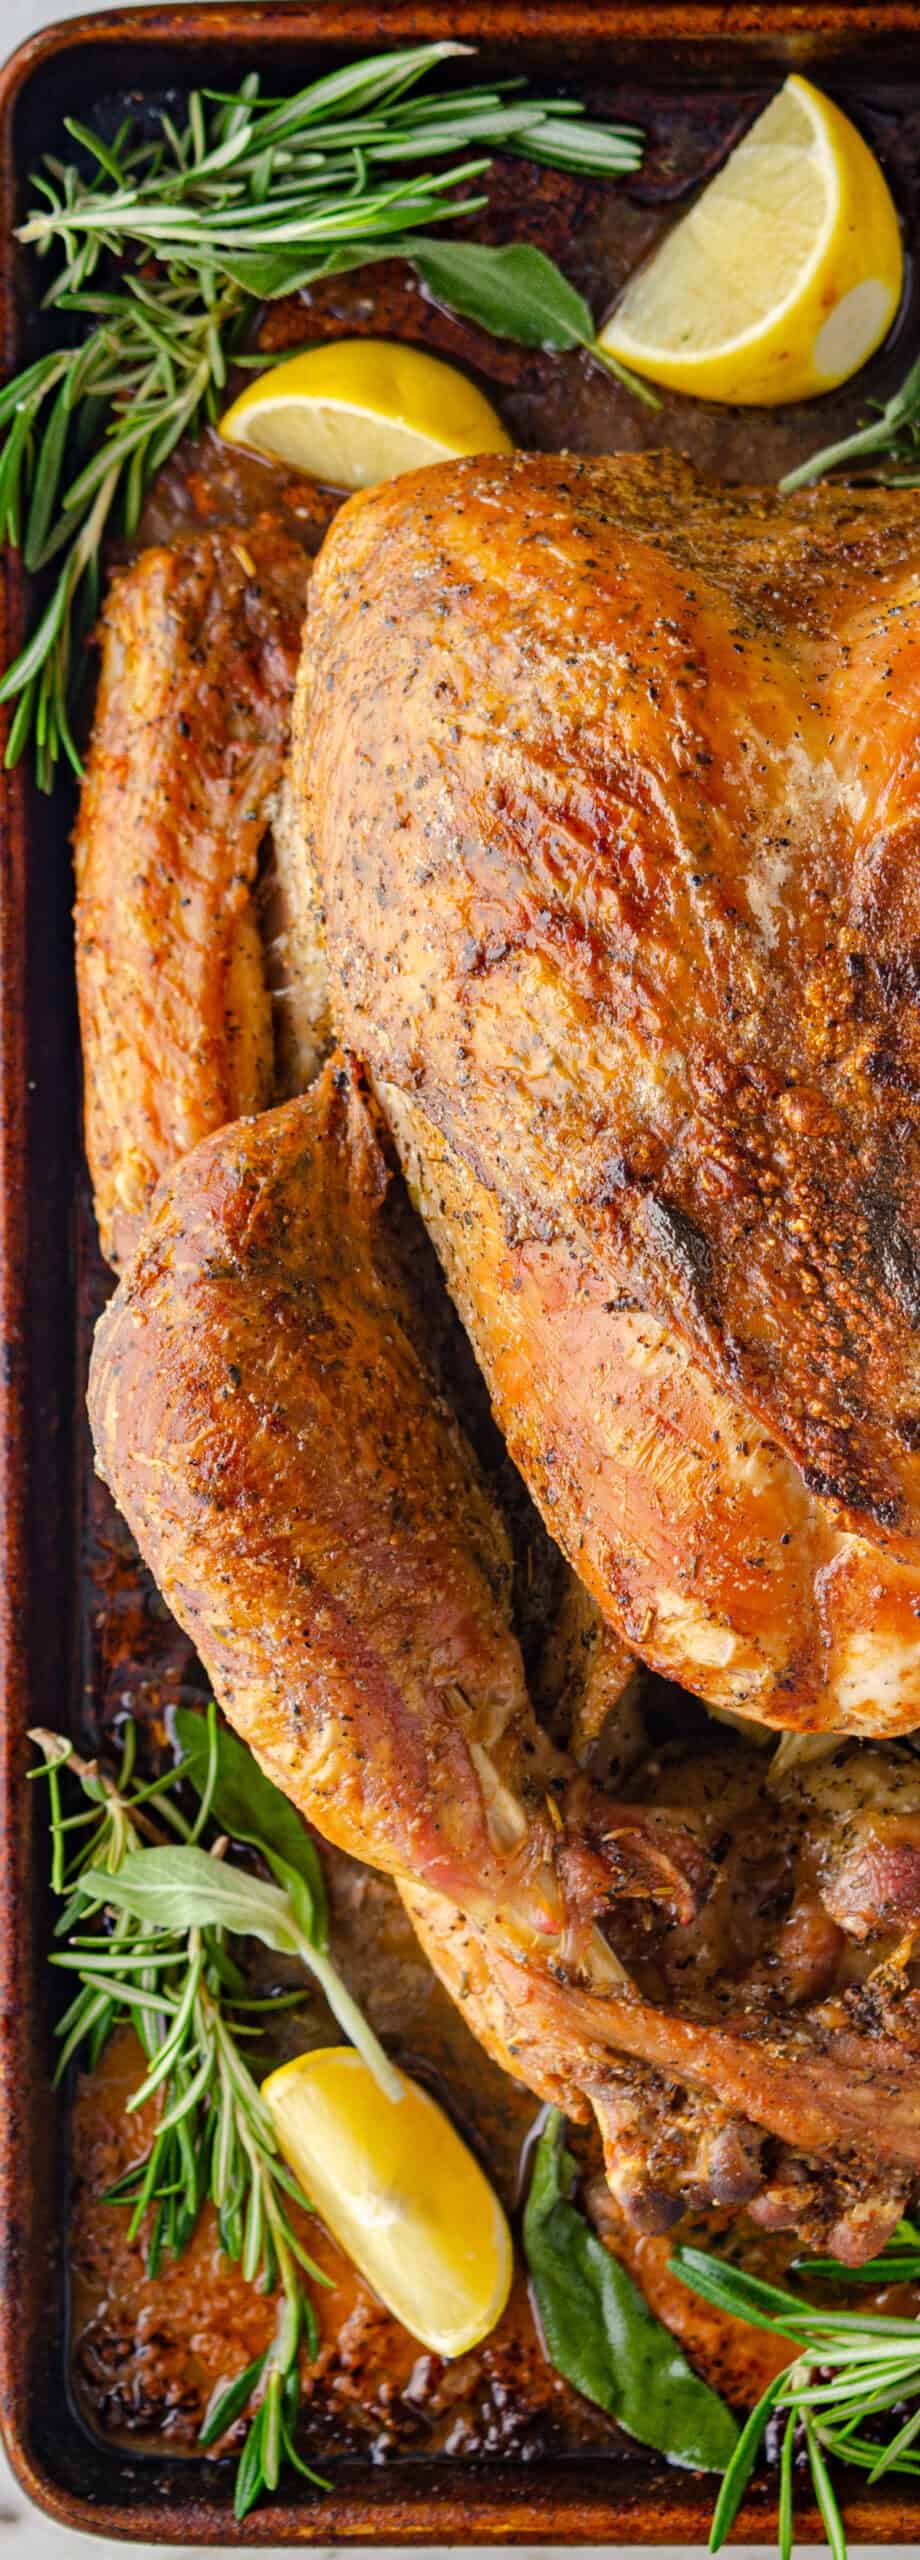
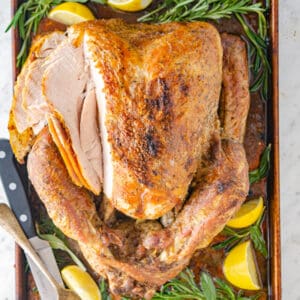
  • Stuff the turkey (Optional). If you are using stuffing of any kind now is the time to add it. You may also fill the cavity with halved lemons, onions, garlic, and parsley to add more flavour to the drippings.
    2 large lemons, 2 small onions, 4 cloves garlic
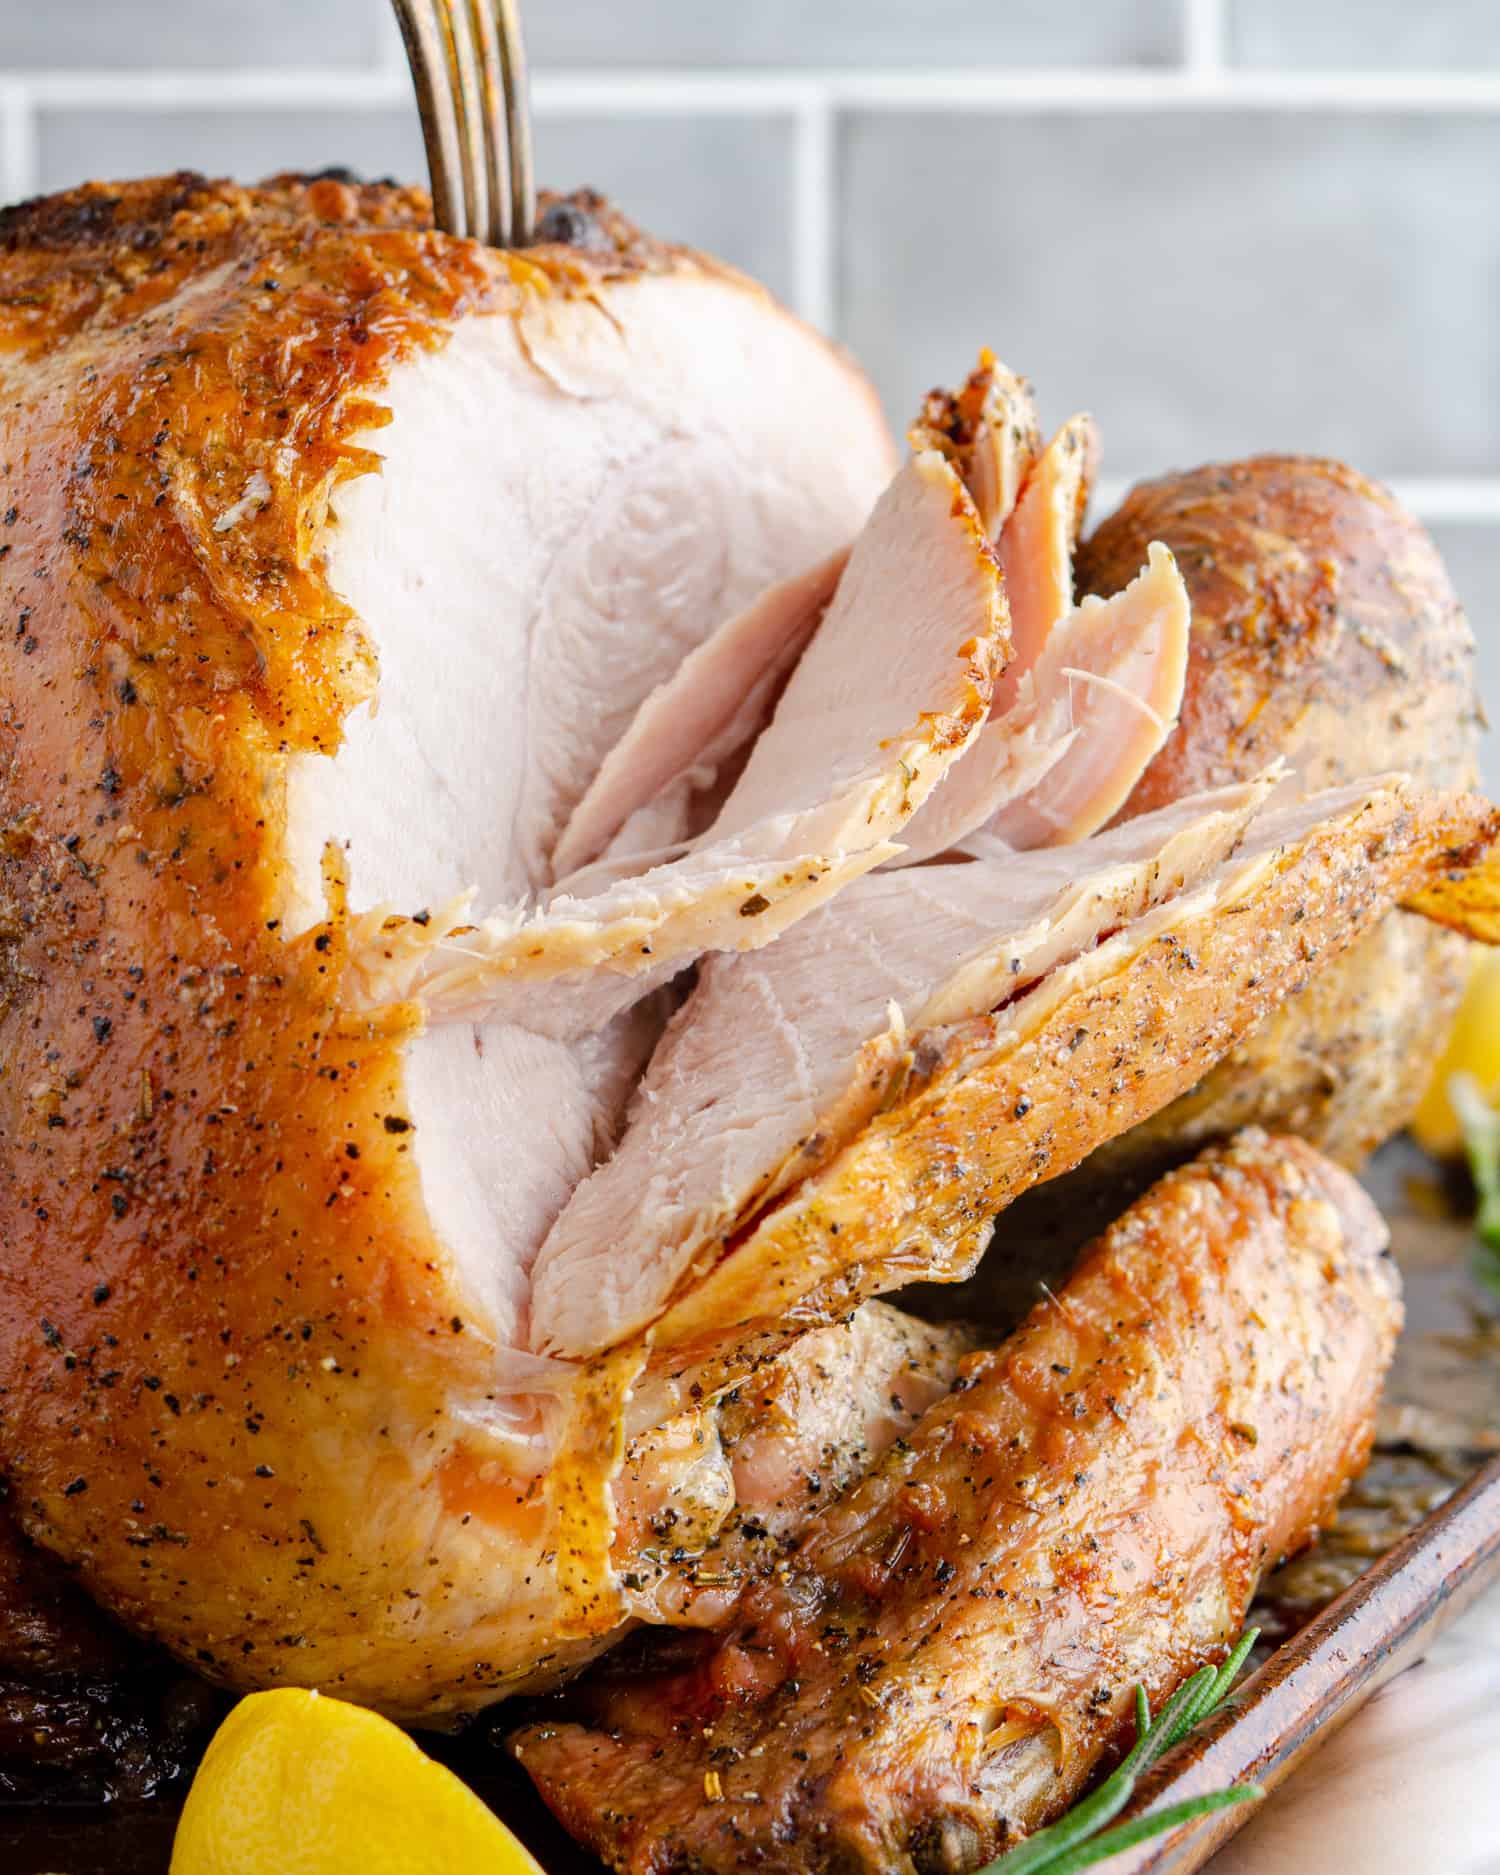
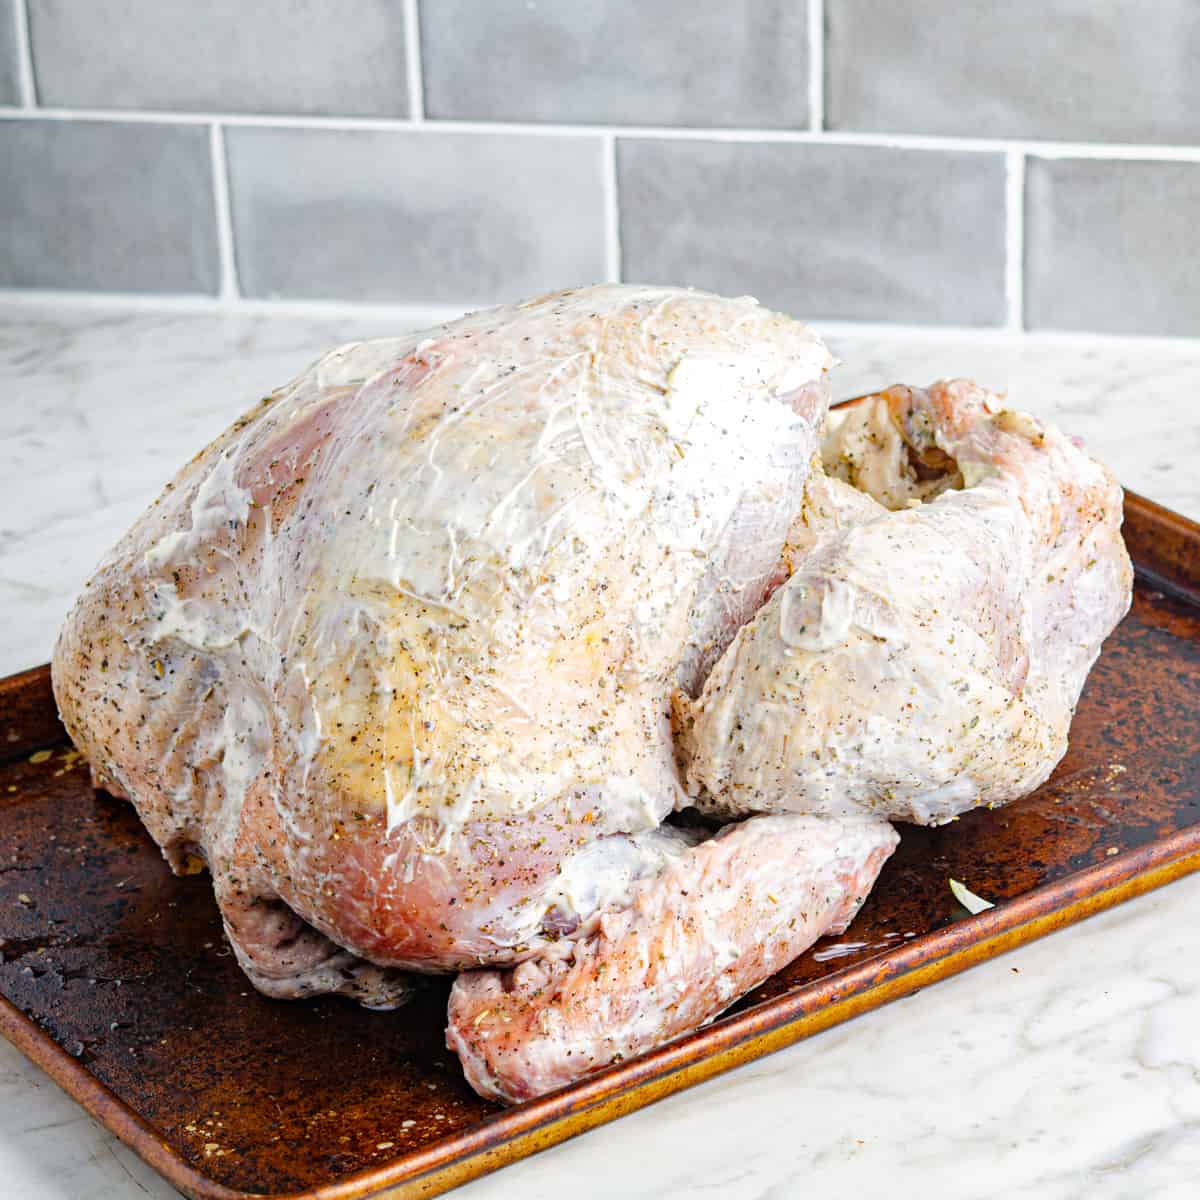
  • Slather the turkey with mayo. Add the mayo to a small bowl and using your hands cover every inch of the turkey in mayo. Make sure to get some under the skin directly on the meat, as well as some on top.
    1 cup mayo
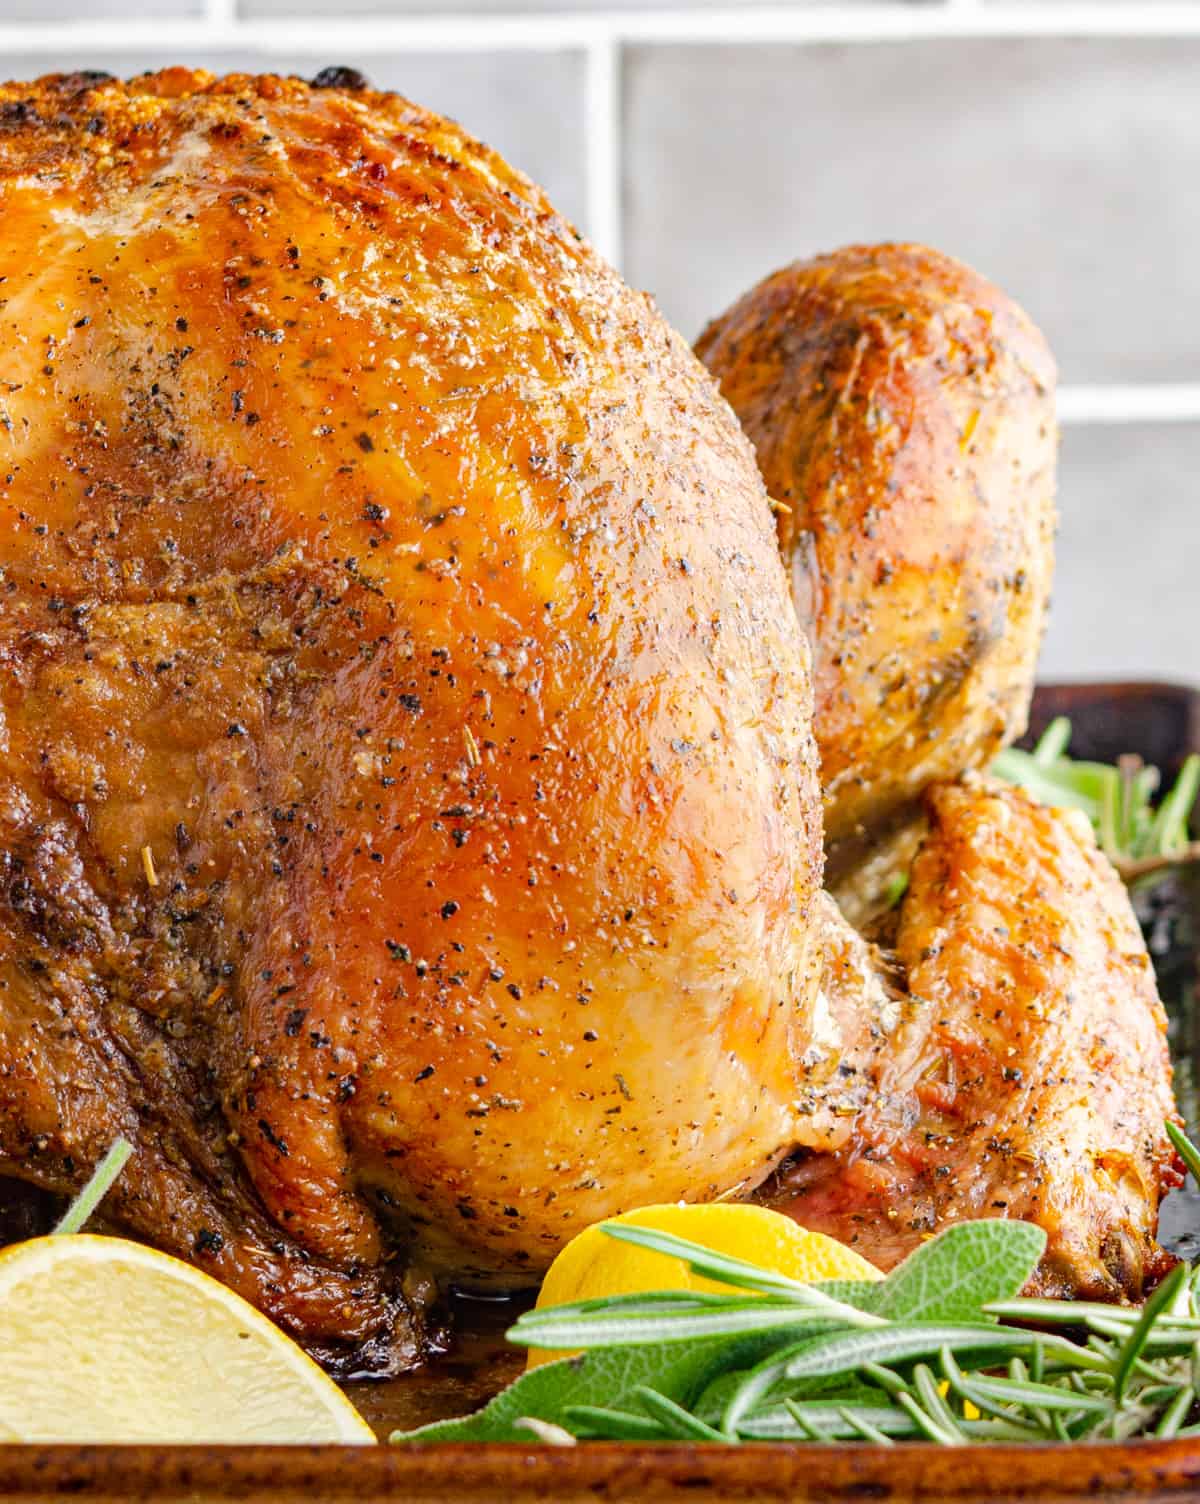
  • Bake. Place the turkey on a roasting pan, elevated if possible. Add the stock/white wine/ water to the bottom of the roasting pan. Bake uncovered in the center of the oven at 425°F [220°C] for 20 minutes, then drop the temperature to 350°F [180°C] for approximately 13 minutes per pound until the meat is cooked to 165°F at least all the way through.
    5 cup broth/white wine/water
  • Check temperature ¾ through the cook. Set a timer for ¾ the amount of time you calculate for your turkey to check the internal temperature and avoid overcooking.
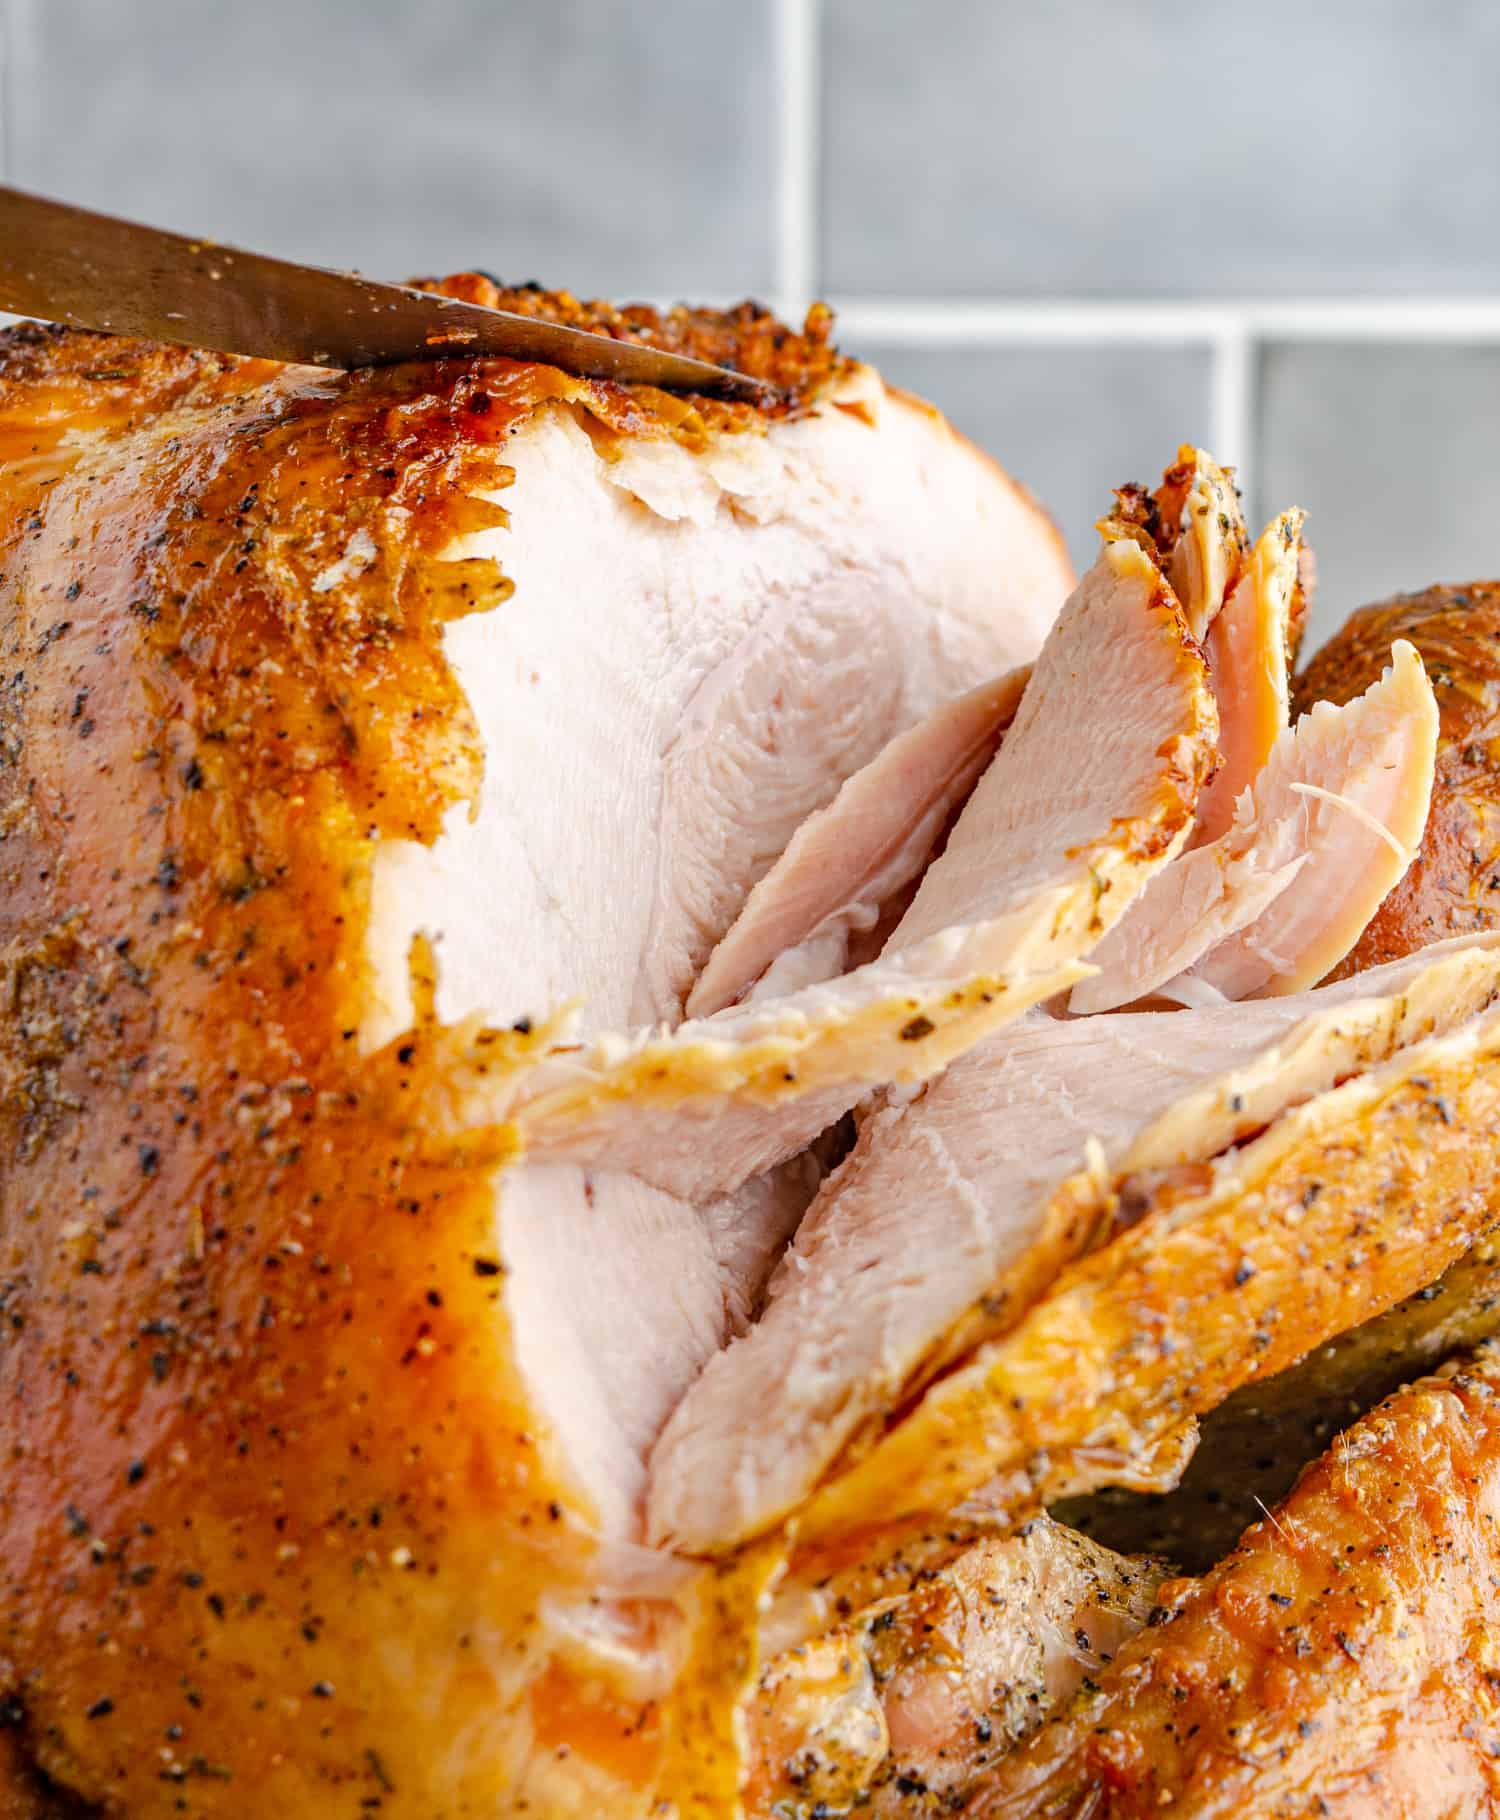
  • Rest the turkey before carving. Once the turkey is cooking through, remove from the oven and rest uncovered for 30 minutes before carving.
ad.

Notes

Never rely solely on your calculated cooking time, use an meat thermometer and insert it into the thickest parts of the meat to make sure its cooked properly. 
In place of mayo you can use softened butter to coat the turkey.
2-3 days is a good starting point for a dry brined turkey. 
If the turkey smells at all rancid do not take a chance, discard the turkey. 

Nutritional information is calculated using the recipe calculator and verified database available from Cronometer. Although every reasonable effort is made to provide accurate information this estimate is provided as courteously and convenience only. To obtain the most accurate representation of the nutritional information in any given recipe, you should calculate the nutritional information with the actual ingredients used in your recipe.

Try the free recipe calculator at Cronometer
Did you give this a try?Mention @yummyforadam or use #yummyforadam on instagram!
Looking for a different low carb recipe?Something you don't see here or looking for a low carb version of your favourite recipe? Let me know so I can get working on it! Contact me directly or leave a comment!
Fully cooked turkey with golden brown skin on a tray
This is an ad.
Have you Seen my latest Helpful post?

Are you craving fruit? 

Feeling like you can’t enjoy any fruit on your low carb diet?

I got you covered, here is a comprehensive list of keto friendly fruits under 10g net carbs per serving!

Find a low carb fruit now !

How To Make Turkey Gravy

The drippings that run off this dry brined turkey make an excellent gravy! If they are too salty for your pallet you can dilute with melted butter, wine, white vinegar, stock, or water.

To make a quick gravy
  • Bring the drippings to a rapid simmer over medium heat.
  • And add any spices or seasonings you may like such as bay leaves, herbs, wine, or vinegar.
  • Simmer, stirring occasionally until the gravy thickens. 
  • Optional: in a small bowl mix thickener such as flour, corn starch, xanthan gum, beson, etc. with a small amount of water to make a slurry. 
  • Whisk the paste into the gravy and simmer, stirring occasionally until it thickens. 

Can I use flour to thicken the gravy?

Yes, you can, even if you are trying to eat low carb, unless you are avoiding gluten you can use flour. 

The amount is so small that spread over the entire batch of gravy it’s no big deal. 2-3 tablespoons of flour mixed with water will be plenty.

You can also use any low carb thickener you like such as xanthan gum, or a thick gelatinous bone broth,  add slowly to avoid a slimy texture. You may just prefer to have the gravy thin like an au jus and not worry about it.

Low Carb Sides for a Turkey Dinner

A classic turkey dinner of course has stuffing, mash, and gravy at least! On a low carb diet these things can be a little tricky, luckily I’ve got you covered!

Try this turkey alongside these low carb sides:

This is an ad.

7 Quick Tips for a Perfect Dry Brined Turkey

  1. Be liberal with the salt, this is not a time to skimp!
  2. Separate the meat from the skin and brine both under and on top of it for more flavour
  3. Make sure the meat brines elevated off the catch pan, uncovered in the fridge for 2-3 days
  4. Do not wash off the brine mixture!
  5. Cover in mayo or butter before roasting
  6. Stuff the cavity with onions, lemons, and herbs for extra flavour.
  7. Make sure you let the turkey rest for at least 30 minutes before carving.

Enjoy!

Leave a Reply

Your email address will not be published. Required fields are marked *

Recipe Rating